Enabling Enhanced Invoice Creation
JustOn Billing & Invoice Management delivers an enhanced dialog for manually creating new (draft) invoices. It offers a guided, seamless workflow – from creating invoices and entering master data to adding invoice line items and previewing the document – without the need to switch between multiple pages.
Understanding field pre-population
When started from the invoice list, the enhanced invoice creation dialog opens with empty fields. However, when started from the detail page of a source (or parent) record, it pre-populates invoice and invoice line item fields from that record.
To do so, JustOn Billing & Invoice Management tries to retrieve the information for each field in the following order:
- Copy the value from an ON field defined for the target field
- Copy the value from the source field that matches the target field
- Suggest the values of all matching source fields for the user to select
- Leave the field empty
JustOn Billing & Invoice Management determines matching source fields from the field type and the field name or label – date fields for Invoice Date, for example, or currency fields for Unit Price. Consequently, a source record can hold multiple candidates for the same target field, which is why the dialog falls back to suggestions.
If, however, you want a specific field to be always filled from one particular source field – instead of leaving the choice to your users – define an ON field for it on the source object. This makes the referenced field the only source for the pre-population.
Users can always modify the pre-populated values in the dialog.
Setting up the dialog usually involves these tasks:
- Adding the invoice build button to the Invoices list view or a record detail page
- Configuring the field sets for the manual invoice creation
- Enabling access to the enhanced invoice creation dialog
- Optionally, removing the default New button from the Invoices list view
Adding Invoice Build Button
Your business may want to allow users to manually create invoices using the enhanced dialog
- from the invoice list, or
- from a record detail page.
Adding Invoice Build Button to Invoice List
To add the New Invoice button to the Invoices list view:
- Navigate to the object management settings of the Invoice object (
ONB2__Invoice__c). - Click List View Button Layout.
- In the List View row, click to open the action menu, then select Edit.
-
Under Custom Buttons, move
New Invoiceto the Selected Buttons column.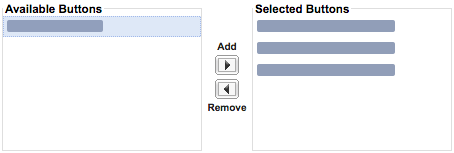
-
Click Save to save the modified page layout.
This allows users to start the enhanced invoice creation dialog from the invoice list by clicking the New Invoice button.
Adding Invoice Build Button to Record Page
To add the New Invoice button to the detail page of a configured source (or parent) object:
-
Navigate to the buttons list of the relevant object.
Click to open the Setup menu and select Setup, then open Objects and Fields > Object Manager > Object > Buttons, Links, and Actions.
-
Click New Action.
-
Specify the following action details.
Detail Value Action Type Lightning Web ComponentLightning Web Component ONB2:invoiceCreationModalLabel New InvoiceName NewInvoice -
Click Save.
-
Navigate to the page layout definition of the relevant object.
Click to open the Setup menu and select Setup, then open Objects and Fields > Object Manager > Object > Page Layouts.
-
In the row of the layout you want to modify, click to open the action menu, then select Edit.
-
Add the New Invoice button to the page layout.
Drag the button from the Mobile & Lightning Actions palette to the Salesforce Mobile and Lightning Experience Actions section.8. Click Save.
This allows users to start the enhanced invoice creation dialog from the detail page of the configured source (or parent) object by clicking the New Invoice button.
Info
If your org has also set up the generic invoice run, including the button to manually trigger the invoice build process from a configured object, make sure to use different labels for the two new invoice buttons.
Configuring Field Sets for Manual Invoice Creation
For the manual invoice creation dialog, four field sets are available to customize the fields that are available in each step of the dialog:
| Step | Object | Field Set |
|---|---|---|
| Step 1 - Sender and Recipient | Invoice | Invoice Creation Parties Involved |
| Step 2 - Configuration | Invoice | Invoice Creation Configuration |
| Step 3 - Invoice Line Items | Invoice Line Item | Edit All |
| Step 4 - Invoice Header & Payment Terms | Invoice | Invoice Creation Payment Terms |
To add a field to the field set:
-
Navigate to the field sets definition of the Invoice or Invoice Line Item object.
Navigate to Setup > Object Manager > Object > Field Sets.
-
Click Edit in the row of the relevant field set.
-
Move the fields to or from the In the Field Set container and reorder them as required.
Make sure to keep all mandatory fields in the field set.
-
Click Save.
This makes the selected fields available to users when manually creating invoices.
Enabling Access to Invoice Creation Dialog
Users who use the enhanced invoice creation dialog must be explicitly granted access to it via a permission set. To do so:
- Click to enter Setup, then navigate to Users > Permission Sets.
-
Click the name of the relevant permission set.
For example, select JustOn Additional Fields.
-
Navigate to Object Settings > Invoice Creation, then click Edit.
- Select the checkboxes
AvailableandVisible. -
Click Save.
This allows users with the given permission set to work with the enhanced invoice creation dialog.
Removing Default New Button
If you add the New Invoice button to the Invoices list view, you may want to remove the standard Salesforce button for creating a new Invoice record from the invoice list. To do so:
- Navigate to the object management settings of the Invoice object (
ONB2__Invoice__c). - Click List View Button Layout.
- In the List View row, click to open the action menu, then select Edit.
-
Under Standard Buttons, deselect
New [New].
-
Click Save to save the modified page layout.
This removes the standard Salesforce button for creating a new Invoice record from the invoice list.