Managing Refunds
Some use cases require merchants or service providers to return money to their customers, like preventing fraud attempts, undoing duplicate or disputed payments, answering specific customer requests, or preventing money laundering attempts. In these cases, businesses refund received payments partially or completely. For an overview of how JustOn Cash Management supports these scenarios, see Refunds.
Typically, users initialize refunds based on the original payment in JustOn Cash Management. Certain circumstances, however, may require refunds to be initialized via a payment service provider. Depending on the approach, the involved operations differ:
Managing Refunds in JustOn Cash Management
Typically, users initialize refunds starting from the original payment in JustOn Cash Management. This section describes possible operations.
Creating Refund
Users manually initiate refunds starting from the original payment. To do so:
-
Open the payment for which you want to create a refund.
To be eligible for refunds, payments must be of the type
Paymentand have the statusCollectedorFinal. -
Click Refund.
This opens the Edit Refund dialog, displaying a chart that shows the current use of the payment amount.
-
Click + Create Refund.
- Specify the refund amount and a refund reason.
-
Click Create.
This saves the refund data.
-
Click Save, then Confirm.
This completes the refund creation, closes the dialog and returns you to the payment.
New refunds have the status
Preparedand need approval before being considered in the payment run or the manual SEPA Credit Transfer order creation.
Editing a Refund
Note
To prevent essential data from being altered unintentionally, we recommend that you do not use next to a data field but to open the Edit Refund dialog using the Edit button.
To edit refund information that is not subject to automatic processing:
- Open the refund to be edited.
- Click Edit.
- Edit the information as necessary.
-
Click Apply.
This saves the new data.
Managing Refund Approval
By default, new refunds have the status Prepared. Setting refunds Approved, marks them as ready for payout, that is, makes them eligible for the payment run or the manual SEPA Credit Transfer order creation.
Info
Users who approve or unapprove refunds must be assigned the custom permission Approve Refund.
For details, see Enabling Refund Approval.
Approving Refund
To approve a refund in the status Prepared, keeping the original payment instrument:
- Open the refund to be approved.
-
Click Approve.
This opens a confirmation dialog, prompting you to confirm the operation.
-
Click Confirm Approval.
This makes the refund ready for payout using the payment instrument of the original payment.
Unapproving Refund
Users may have approved refunds by mistake. You can undo an approval, setting it Prepared again. To unapprove a refund in the status Approved:
- Open the refund whose approval you want to undo.
-
Click Unapprove.
This opens a confirmation dialog, prompting you to confirm the operation.
-
Click Confirm Unapproval.
This revokes the refund approval, preventing the refund from being paid out and blocking the money again.
Redirecting Refund to SEPA Credit Transfer
Info
Users who both approve/unapprove refunds and change refund payment instruments must be assigned the custom permission Approve Unreferenced Refund.
For details, see Enabling Refund Approval.
If the original payment instrument is no longer available or does not allow outgoing money flow, you can change the refund payment method to SEPA Credit Transfer. Doing so will directly approve the refund.
Switching to SEPA Credit Transfer is available for refunds in the statuses Prepared and Approved.
- Open the refund for which to change the payment instrument.
-
Click Change Recipient Data & Approve.
This opens the Change Recipient Data & Approve Refund dialog, prompting you to set the relevant bank details.
-
Optionally, set the source bank account in the From section.
Generally, JustOn Cash Management automatically sets the target bank account of the original payment as the source bank account for the refund. Modify the refund source bank account only if this bank account does no longer exist.
-
Under Return to, select the target bank account.
The Return to section shows the bank accounts that relate to a payment instrument that is eligible for the SCT creation.
If there is no available bank account, you can manually specify the relevant target bank account details. To do so:
- Click Manual Input.
- Specify the bank account holder and the IBAN.
-
Click Confirm Change & Approval.
This makes the refund ready for payout, changing the refund payment method to SEPA Credit Transfer.
Canceling Refund
Canceling a refund "reinstates" the money on the original payment. This makes it available for settlements again.
To cancel a refund in the status Prepared, Approved or Failed:
- Open the refund to be canceled.
-
Click Cancel.
This opens the Cancel Refund dialog, prompting you to specify a cancellation reason.
-
Select a cancellation reason.
You can select
Otherand specify your own reason. -
Click Confirm Refund Cancellation.
This cancels the current refund and makes the involved amount available on the original payment again.
Redoing Failed Refund
Info
Users who retry refunds and change refund payment instruments must be assigned the custom permission Approve Unreferenced Refund.
For details, see Enabling Refund Approval.
Users can repeat a failed refund attempt, changing the refund payment method to SEPA Credit Transfer. Doing so will directly approve the refund.
Retrying is available for refunds in the status Failed.
- Open the failed refund to be repeated.
- Click Retry.
-
Optionally, select a refund date for the new refund.
By default, JustOn Cash Management uses the current date.
-
Optionally, set the source bank account in the From section.
Generally, JustOn Cash Management automatically sets the target bank account of the original payment as the source bank account for the refund. Modify the refund source bank account only if this bank account does no longer exist.
-
Under Return to, select the target bank account.
The Return to section shows the bank accounts that relate to a payment instrument that is eligible for the SCT creation.
If there is no available bank account, you can manually specify the relevant target bank account details. To do so:
- Click Manual Input.
- Specify the bank account holder and the IBAN.
-
Click Confirm Retry and Approval.
This creates a new refund, which replaces the failed refund, and makes it ready for payout using SEPA Credit Transfer.
Creating Credit Transfer Orders From Refunds
JustOn Cash Management allows for issuing SEPA Credit Transfer (SCT) orders based on approved refunds, which, on their part, may be created manually or may be the result of a credit balance.
Note
Make sure that the button Credit Transfer is available on the Refund list view, see Enabling Credit Transfer.
To start the credit transfer order generation from approved refunds:
- Open the Refunds tab.
- Select the list view
Approved Refunds. -
Select the refunds to be processed.
Continuing without selection includes all listed refunds.
Refunds to be processed in one go must be subject to the same bank access. The relevant bank access is determined via
Bank Accounton the refund or, if this is not set, viaPreferred Bank Accounton the business entity. Otherwise, the SEPA order creation and upload will fail. -
Click Credit Transfer.
This displays the number of refunds to be processed.
-
Click Next.
This starts the SEPA order creation and upload. The page shows the job progress and log messages.
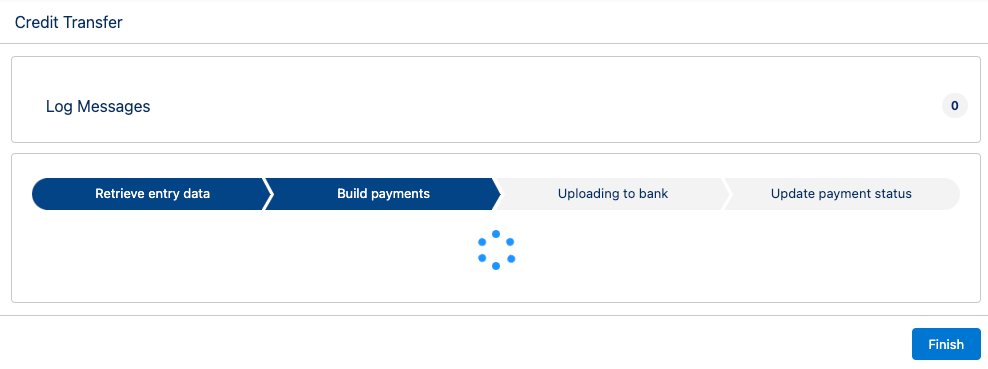
Even in case of an error, the job may still complete. To be sure of the credit transfer order generation, review the
Error Messagefield of the failed refunds (using the list viewFailed Refunds), or create a report to show the result.Clicking Finish returns you to the Refunds tab.
Info
In addition to manually creating a SEPA order for a refund, your organization can automatically issue approved refunds using scheduled payment runs via payment service providers.
Managing Payment Provider-Initiated Refunds
Typically, users initialize refunds based on the original payment in JustOn Cash Management. Certain circumstances, however, may require refunds to be initialized via a payment service provider. In this case, any transactions will synchronize with JustOn Cash Management via webhook notifications. Subsequently, JustOn Cash Management will update both payment and refund records accordingly.
This section outlines the process of initiating refunds directly through payment service providers and tracking them with the aid of webhook notifications in JustOn Cash Management.
Initiating Refund
JustOn Cash Management supports refunds in response to payments made via Mollie. Users initiate refunds from the dashboard of the payment service provider. Typically, this involves the following steps:
- Log in to your payment provider account and access the dashboard.
- Find the payment transaction for which you need a refund.
- Initiate the refund, specifying the refund amount, and confirm the operation.
For details on initializing a refund via the Mollie Dashboard, see How do I refund a payment?.
Tracking Refund Status
The refund process is managed by the payment service provider (see Refund via Payment Provider). Any data modifications are synchronized with JustOn Cash Management via webhook notifications.
In case a refund has failed, proceed as described in Redoing Failed Refund.
Adjusting Original Statement
Changing the open amount of an entry requires adjusting the original statement (the source of the entry) to ensure the integrity of downstream processes. If you have integrated JustOn Cash Management with JustOn Billing & Invoice Management and, consequently, produce entries from invoices, you issue a partial credit for the original invoice.
-
Open the related invoice.
Use the
Statement Noor theStatement IDas set on the related entry to get to the correct invoice. -
Click Create Credit.
- Select the relevant invoice line item and specify the amount to be credited in accordance with the refunded amount.
-
Click Save.
For details, see Creating Credits.