Setting Up Avalara E-Invoicing and Live Reporting (ELR)
DE E-Rechnung
FR e-facture
To support enterprise and public e-invoicing, JustOn Billing & Invoice Management can prepare electronic invoices.
Be aware that there are various e-invoice formats, distribution channels, and operators. To help get a wider reach, JustOn Billing & Invoice Management (as of v2.110) integrates with Avalara E-Invoicing and Live Reporting (ELR). This global e-invoicing network supports many protocols and document formats and interoperates with tax authority platforms and exchange networks worldwide, enabling automated e-invoicing across multiple countries and tax jurisdictions.
Avalara E-Invoicing and Live Reporting (ELR) is a paid service. Before you can use Avalara ELR with JustOn Billing & Invoice Management, you must enter into a corresponding contract with Avalara.
Summary
Setting up Avalara ELR in JustOn Billing & Invoice Management involves the following tasks
- Enabling the e-invoice creation in JustOn Billing & Invoice Management
- Configuring the Avalara ELR connection
Prerequisites
- Avalara ELR introduction
- Avalara E‑Invoicing and Live Reporting Demo | YouTube
- Avalara user account
-
Prior to using Avalara ELR with JustOn Billing & Invoice Management, your organization must create a user account with Avalara.
- Active Avalara account with ELR service enabled
- Access to the Avalara Cockpit (management console)
-
Client key and client secret for the Avalara ELR API
To get the client key and client secret in the Avalara Cockpit, navigate to Integrations > License key and client secrets > Create key. Copy the produced values.
- Country activation
-
As an Avalara user, you explicitly activate e-invoicing for countries across the world. For details, see E-Invoicing Activation | Avalara Knowledge Center.
- Countries activated for e-invoicing in your Avalara Cockpit
- Required country mandates enabled for your target markets
- Business entity
-
To use Avalara ELR with JustOn Billing & Invoice Management, you must properly set up your business entity as described in Preparing Business Entity.
Your business entity maps to a company in Avalara ELR.
- Common e-invoice setup
- Before setting up Avalara ELR, make sure to complete the common e-invoice setup in JustOn Billing & Invoice Management.
Configuring Avalara ELR Connection
To access the Avalara ELR service, you must provide authentication credentials and configure the connection settings. To do so:
- Click to access the App Launcher, and select JustOn Billing Configuration.
-
Open the Avalara ELR Configuration tab.
Accessing the Avalara ELR configuration dialog requires
Lightning Web Securityenabled for your org.To check for this setting, click to enter Setup, then navigate to Security > Session Settings, and make sure that
Use Lightning Web Security for Lightning web components and Aura componentsis selected. -
Select the Connection sub-tab.
-
In the
Environmentfield, select the relevant Avalara ELR service environment to which to connect.There are two options:
Environment Intended Use Production Live operations Sandbox Development and testing -
Enter your Avalara ELR API access data.
Client ID– your Avalara ELR API client keyClient Secret– your Avalara ELR API client secret
See Avalara user account in Prerequisites.
-
Optionally, click Refresh next to the
Signature Keyfield to create a new signature key to be used for signed incoming messages from Avalara.Copy the produced value to the corresponding field in the Avalara Cockpit. For details, see Add webhook | Avalara Knowledge Center.
-
Click Get URL next to the
Notification URLfield to retrieve the URL used for incoming messages from Avalara.Copy the produced value to the corresponding field in the Avalara Cockpit. For details, see Add webhook | Avalara Knowledge Center.
-
Click Save.
This saves the current configuration.
-
Click Test Connection to test the connection to the Avalara ELR service.
This checks the connection with the currently stored credentials.
-
Click Activate.
This checks the current configuration and activates the connection if successful.
Info
The produced values for Signature Key and Notification URL must be manually synchronized with your Avalara account.
Remember to copy the values to the clipboard and to transfer them to the Avalara Cockpit.
Configuring Avalara ELR Country Mandates
Individual country mandates allow for flexibly controlling the e-invoice formats, distribution channels, additional documents, etc. – according to the legal and technical requirements for e-invoicing per country and, where applicable, specific contexts (like B2B or B2G).
Each target market to which you want to send e-invoices with Avalara ELR requires an individual country mandate.
Note
Before using an Avalara ELR country mandate with JustOn Billing & Invoice Management, you must activate the country in the Avalara Cockpit. For details, see E-Invoicing Activation | Avalara Knowledge Center.
Adding Country Mandate
Once you have activated a country in the Avalara Cockpit, you import the Avalara ELR country mandate to JustOn Billing & Invoice Management. To do so:
- Click to access the App Launcher, and select JustOn Billing Configuration.
- Open the Avalara ELR Configuration tab.
- Select the Country Mandates sub-tab.
-
Click Add Mandate.
This opens a dialog that lists the available Avalara ELR country mandates.
If you cannot find a specific country mandate you may have to activate it in the Avalara Cockpit first.
-
Select the Avalara ELR mandate you want to add.
-
Click Next.
This opens the Select Business Entity dialog.
-
In the
Business Entityfield, select the business entity that will use the selected country mandate. -
Click Add
This adds the selected Avalara ELR country mandate. To make it actually available to the selected business entity for e-invoicing, you must add the country mandate as e-invoice format and activate it.
Info
For each Avalara ELR country mandate, JustOn Billing & Invoice Management saves a dedicated Configuration record, where the type is always Avalara ELR Mandate and the subtype specifies the particular country mandate.
Understanding Country Mandate Data
The Data field of the country mandate configuration holds the mandate settings in JSON notation. Some keys are set when adding the mandate and rarely need to be changed, others configure optional behavior.
| Key | Type | Description | Set By |
|---|---|---|---|
e-invoice-file-type |
String | Specifies which of the files produced for the mandate is the actual e-invoice – see E-Invoice File Type | Mandate import |
document-type-mapping |
Object | Maps invoices and credits to the document types supported by the mandate – see Document Type Mapping | Mandate import |
enable-document-level-allowances-and-charges |
Boolean | Writes offsetting positions as document-level allowances – see Enabling Document-Level Allowances and Charges | Org admin, optional |
response-mapping |
Array | Writes data returned by the tax authority to invoice fields – see Mapping Avalara Response Data | Org admin, optional |
post-processing |
Object | Controls the post-processing after Avalara has completed the document | Org admin, optional |
The post-processing object supports the following keys:
| Key | Type | Description |
|---|---|---|
rebuild-pdf |
Boolean | Regenerates the invoice PDF after the response mapping – see Rebuilding Invoice PDF |
distribution-channel |
String | Sets the post-processing mode, Email or Manual |
email-file-types |
String | Specifies the files to be attached to the invoice email, by default Invoice Pdf, E-Invoice |
Keys of the type boolean expect their value without quotation marks. Specifying "true" instead of true causes a validation error when saving the configuration.
Full mandate Data example
A complete Data field for a mandate that uses the response mapping and the post-processing – and that has document-level allowances and charges enabled – looks like this:
{
  "e-invoice-file-type": "application/xml",
  "enable-document-level-allowances-and-charges": true,
  "document-type-mapping": {
    "ubl-invoice": {
      "field": "ONB2__Class__c",
      "value": "Invoice"
    },
    "ubl-creditnote": {
      "field": "ONB2__Class__c",
      "value": "Credit"
    }
  },
  "response-mapping": [
    {
      "response-key": "IdentificativoSdI",
      "target-field": "CustomRegistrationNumber__c"
    },
    {
      "response-key": "QRCode",
      "target-field": "CustomQRCode__c"
    }
  ],
  "post-processing": {
    "rebuild-pdf": true,
    "distribution-channel": "Email",
    "email-file-types": "Invoice Pdf, E-Invoice"
  }
}
E-Invoice File Type
Depending on the country mandate, Avalara ELR may return more than one file – for example, an XML document accompanied by a PDF file. The e-invoice-file-type key specifies which of them is the e-invoice. This determines how JustOn Billing & Invoice Management handles the returned files, and consequently, which document is the customer-facing invoice.
| Value | The e-invoice is | Content version type of a returned PDF | Customer-facing invoice document |
|---|---|---|---|
application/pdf |
The returned PDF itself – a hybrid ZUGFeRD file that carries the invoice data as embedded XML | E-Invoice |
The PDF returned by Avalara |
Any other type, like application/xml |
The returned XML document, while a PDF returned in addition is a supporting document | Supporting E-Invoice |
The invoice PDF produced by JustOn Billing & Invoice Management |
Usually, the mandate import sets this key correctly. Change it only if the files produced for your mandate require a different interpretation.
Setting the key correctly matters beyond the e-invoice itself. If the e-invoice is a PDF file, this file is the invoice document – and therefore the file that all invoice PDF operations work on: JustOn Billing & Invoice Management sends and distributes it, and rebuilding or recreating the invoice PDF writes a new version of exactly this file. The invoice PDF originally produced by JustOn Billing & Invoice Management is left untouched.
This is intended for ZUGFeRD files, where the e-invoice PDF is what the customer receives. It becomes a problem when a file is declared as the e-invoice although it is not.
Note
Both directions of a wrong setting damage a document:
-
If
e-invoice-file-typeisapplication/pdfalthough the PDF returned by Avalara is merely a supporting document – like a clearance PDF carrying a QR code – the invoice PDF rebuild overwrites this supporting document instead of the invoice PDF. The invoice PDF itself stays unchanged, and the document returned by Avalara is lost.Set the key to the type of the file that actually is the e-invoice, usually
application/xml. The PDF returned by Avalara then becomes aSupporting E-Invoice, and the rebuild targets the JustOn invoice PDF as intended. -
If Avalara returns a ZUGFeRD file, this PDF is the e-invoice and the only valid invoice document. It must never be overwritten – see Rebuilding Invoice PDF.
Document Type Mapping
Avalara ELR country mandates distinguish invoice documents (ubl-invoice) from credit note documents (ubl-creditnote). The document-type-mapping key specifies how JustOn Billing & Invoice Management decides which document type applies to a given record.
By default, the decision is based on the invoice field Class (ONB2__Class__c): records with the value Invoice produce a ubl-invoice document, records with the value Credit a ubl-creditnote document.
"document-type-mapping": {
  "ubl-invoice": {
    "field": "ONB2__Class__c",
    "value": "Invoice"
  },
  "ubl-creditnote": {
    "field": "ONB2__Class__c",
    "value": "Credit"
  }
}
| Key | Description |
|---|---|
field |
The Salesforce API name of the invoice field that determines the document type |
value |
The field value that identifies the document type |
Usually, this default mapping works out of the box. If a project-specific solution distinguishes invoices from credits by another field, specify this field and the corresponding value for each of the two document types.
Activating or Deactivating Country Mandate
To activate (or deactivate) an Avalara ELR country mandate:
- Click to access the App Launcher, and select JustOn Billing Configuration.
- Open the Avalara ELR Configuration tab.
- Select the Country Mandates sub-tab.
-
Click the configuration name for the mandate you want to activate (or deactivate).
This opens the country mandate configuration detail page.
-
Click Activate (or Deactivate).
This activates (or deactivates) the selected Avalara ELR country mandate, allowing (or disallowing) the use for e-invoicing with JustOn Billing & Invoice Management.
Info
Only valid mandates can be activated. Before actually activating a mandate, JustOn Billing & Invoice Management automatically executes a validation.
Customizing Country Mandate
Avalara ELR country mandates include standard mappings for invoices and credits from JustOn Billing & Invoice Management fields to Avalara ELR country mandate fields. Generally, these mappings work out of the box for most use cases. However, particular business cases may require some modification, for example, if a specific country mandate requires data that JustOn Billing & Invoice Management does not provide by default.
Understanding data mapping
For each country mandate, there are two mapping files that define the relations between JustOn Billing & Invoice Management fields and Avalara ELR country mandate fields (in JSON notation). These JSON files are saved as Content Version records that are associated with the relevant country mandate configuration.
| File | Purpose |
|---|---|
| Avalara ELR Invoice Field Configuration | Maps invoice data to the relevant e-invoice fields |
| Avalara ELR CreditNote Field Configuration | Maps credit data to the relevant e-invoice fields |
Each file holds one definition per e-invoice field. A field definition identifies its target using the key path – the position of the field in the e-invoice XML structure. This is the notation that the E-Invoice Error field uses as well, which allows for locating the definition that produces an error.
The exact spelling of the path depends on the country mandate. Search for the path as the mapping file writes it.
Where the e-invoice structure allows a field to repeat, the file holds one definition per occurrence – all of them with the same path. In this case, the key exampleOrFixedValue identifies the occurrence you need, and the key optionality states whether the mandate requires it.
To hold the data relations for its target field, a field definition can include two more keys:
ONB2_Standard_Mapping_Information– specifies the default mapping (read-only)ONB2_Custom_Mapping– configures custom overrides using either a field mapping or static values (editable)
{
    "path" : "Invoice/cac:AdditionalDocumentReference/cbc:DocumentTypeCode",
    "fieldId" : "154",
    "exampleOrFixedValue" : "130",
    "optionality" : "Optional",
    "cardinality" : "0..1",
    "ONB2_Custom_Mapping" : {
        "StaticValue" : "916"
    }
}
A custom mapping always applies to the field definition that contains it. Consequently, the examples below show the two mapping keys only – you always write them within the definition of the target field.
When working with the mapping keys, be aware of the following:
- A custom mapping always takes precedence. If a field definition includes
ONB2_Custom_Mapping, JustOn Billing & Invoice Management takes the value from there and does not evaluate the standard mapping for this field. - If
ONB2_Standard_Mapping_Informationspecifies"Source" : "Transformation", the value does not come from a single field. Instead, JustOn Billing & Invoice Management produces it in its standard e-invoice generation, where the EN 16931 business rules apply. Depending on the invoice data, the value may therefore be omitted – see Market-Specific Overrides. - A field definition that only groups other fields, like
.../cac:PartyTaxScheme/cac:TaxScheme, holds neither of the two mapping keys and cannot be mapped. To provide a value, map the definition of the contained field, like.../cac:PartyTaxScheme/cac:TaxScheme/cbc:ID.
→ Map to a specific object and field
"ONB2_Standard_Mapping_Information" : {
    "SourceObject" : "ONB2__Invoice__c",
    "Field" : "ONB2__Date__c"
},
"ONB2_Custom_Mapping" : {
    "SourceObject" : "ONB2__Invoice__c",
    "Field" : "CustomDate__c"
}
SourceObject– specifies the Salesforce API name of the object that contains the field you want to map-
Field– specifies the Salesforce API name of the field (onSourceObject) you want to mapThe mapping can point to formula fields, which allows for leveraging custom logic.
JustOn Billing & Invoice Management supports the following objects for Avalara ELR field mappings:
| Object | API Name | Description |
|---|---|---|
| Invoice | ONB2__Invoice__c |
Main invoice record |
| Invoice Line Item | ONB2__InvoiceLineItem__c |
Individual line items on invoices |
| Business Entity | ONB2__Tenant__c |
The business entity (company) |
| Account | Account |
Customer account records |
| Contact | Contact |
Individual contact records |
| Payment Instrument | JPAY1__PaymentInstrument__c |
Payment method information |
- Examples by object
-
-
Map from Invoice field:
"ONB2_Custom_Mapping": { "SourceObject": "ONB2__Invoice__c", "Field": "ONB2__Date__c" } -
Map from Business Entity field:
"ONB2_Custom_Mapping": { "SourceObject": "ONB2__Tenant__c", "Field": "ONB2__TaxID__c" } -
Map from Account field:
"ONB2_Custom_Mapping": {
  "SourceObject": "Account",
  "Field": "BillingStreet"
}
-
→ Provide a fixed value instead of a field mapping
"ONB2_Standard_Mapping_Information" : {
    "SourceObject" : "ONB2__Invoice__c",
    "Field" : "ONB2__Date__c"
},
"ONB2_Custom_Mapping" : {
    "StaticValue": "2025-10-25"
}
To access the country mandate configuration:
- Click to access the App Launcher, and select JustOn Billing Configuration.
- Open the Avalara ELR Configuration tab.
- Select the Country Mandates sub-tab.
-
Click the configuration name for the mandate you want to edit.
This opens the country mandate configuration detail page. It shows the basic mandate data and links to the mapping files.
Now customizing the data mapping usually involves these steps:
- Validating the existing mapping
- Downloading the relevant mapping file
- Applying the modifications
- Uploading the modified file
Some country mandates require a custom mapping for specific fields:
- Italian country mandates always require a custom mapping for the document type, see Mapping Italian FatturaPA Extension Fields.
- The Portuguese clearance mandate requires a custom mapping for the VAT identifiers of seller and buyer, see Mapping Portuguese Party VAT Identifiers.
Info
Since the mapping files are saved as Content Version records, the access and management options for Salesforce Files apply.
Validating Existing Mapping
To check if the existing mapping meets the requirements, you validate the country mandate.
-
On the country mandate configuration detail page, click Validate.
This validates the selected mandate and the field mappings. If the validation fails or if you need a custom mapping, proceed to modify the mapping file.
Downloading Mapping File
To download the relevant mapping file:
-
On the country mandate configuration detail page, click the name of the JSON mapping file you want to modify.
This opens the Salesforce file management overlay dialog.
-
Click Download.
Save the file using your browser's file download dialog.
Modifying Mapping File
To edit the downloaded mapping file:
- Open the downloaded JSON mapping file in a text editor of your choice.
- Locate the field definition you want to edit – each definition is identified by its
pathkey. -
Add or modify the
ONB2_Custom_Mappingsection as required.There are two options:
→ Map to a specific object and field
"ONB2_Standard_Mapping_Information" : {
    "SourceObject" : "ONB2__Invoice__c",
    "Field" : "ONB2__Date__c"
},
"ONB2_Custom_Mapping" : {
    "SourceObject" : "ONB2__Invoice__c",
    "Field" : "CustomDate__c"
}
The mapping can point to formula fields, which allows for leveraging custom logic.
For details, see "Understanding data mapping" under Customizing Country Mandate.
→ Provide a fixed value instead of a field mapping
"ONB2_Standard_Mapping_Information" : { "SourceObject" : "ONB2__Invoice__c", "Field" : "ONB2__Date__c" }, "ONB2_Custom_Mapping" : { "StaticValue": "2025-10-25" } -
Save the file.
Standard mapping information
Do not modify the ONB2_Standard_Mapping_Information sections. They define the default mappings and are automatically updated when mandates are synchronized with Avalara.
Uploading Modified Mapping File
To upload the modified mapping file:
-
On the country mandate configuration detail page, click the name of the JSON mapping file you want to modify.
This opens the Salesforce file management overlay dialog.
-
Click to open the action menu, then select Upload New Version.
- Select the modified mapping file using your browser's file selection dialog.
- Optionally, provide an update message.
-
Click Upload.
This makes the modified mapping file available and returns you to the country mandate configuration detail page.
-
Click Validate.
This validates the selected mandate and the customized field mappings.
Mapping Italian FatturaPA Extension Fields
Italian country mandates (FatturaPA, sent to the SDI exchange system) require the document type (TipoDocumento) as a UBL extension. The standard mapping fills neither of the two fields that make it up – the extension URI, which identifies the extension, and the type code, which carries the document type itself. Without a custom mapping for both fields, the validation rejects the document, and the E-Invoice Error field on the invoice shows the following errors:
Required field missing or empty: ubl:Invoice/ext:UBLExtensions/ext:UBLExtension/ext:ExtensionURI
Required field missing or empty: ubl:Invoice/ext:UBLExtensions/ext:UBLExtension/ext:ExtensionContent/cbc:TypeCode
To fix this, modify the Avalara ELR Invoice Field Configuration of the Italian country mandate:
-
Download the relevant mapping file.
For details, see Downloading Mapping File.
-
Locate the two field definitions.
Field Path Static Value ubl:Invoice/ext:UBLExtensions/ext:UBLExtension/ext:ExtensionURIurn:fdc:agid.gov.it:fatturapa:TipoDocumentoubl:Invoice/ext:UBLExtensions/ext:UBLExtension/ext:ExtensionContent/cbc:TypeCodethe applicable document type code Italian country mandates support a dozen FatturaPA extensions, like
SistemaEmittenteorModalitaPagamento, and every one of them uses these two paths. Searching for the path alone therefore produces a number of matches. The definitions to modify are the ones whoseexampleOrFixedValuenames the document type extension – they are also the only ones of the group that the mandate lists asRequired. -
Add the required static values.
"path" : "ubl:Invoice/ext:UBLExtensions/ext:UBLExtension/ext:ExtensionURI",
"exampleOrFixedValue" : "urn:fdc:agid.gov.it:fatturapa:TipoDocumento",
"optionality" : "Required",
"ONB2_Custom_Mapping" : {
    "StaticValue": "urn:fdc:agid.gov.it:fatturapa:TipoDocumento"
}
"path" : "ubl:Invoice/ext:UBLExtensions/ext:UBLExtension/ext:ExtensionContent/cbc:TypeCode", "exampleOrFixedValue" : "TD01", "optionality" : "Required", "ONB2_Custom_Mapping" : { "StaticValue": "TD01" }The document type code
TD01applies to ordinary invoices. If your business issues other document types – like advance invoices or self-billed invoices – use the applicable code from the ItalianTipoDocumentocode list, or configure a field mapping to a field or formula field that produces the code. -
Save the file.
-
Upload the modified file as a new version.
For details, see Uploading Modified Mapping File.
After the subsequent validation, the e-invoices of the Italian country mandate carry the document type extension.
Info
This applies to invoice documents only. For credits, the two fields are not required, which is why the Avalara ELR CreditNote Field Configuration needs no corresponding modification.
Mapping Portuguese Party VAT Identifiers
The Portuguese clearance mandate (PT-B2B-CLEARANCE) always requires the VAT identifiers of the seller and the buyer. If at least one invoice line item has the VAT category code O (Services outside scope of tax), however, the standard mapping omits both values, following the EN 16931 business rule BR-O-02 (see Market-Specific Overrides). Without a custom mapping, the validation rejects the document, and the E-Invoice Error field on the invoice shows the following errors:
Avalara validation failed:
Required field missing or empty: Invoice/cac:AccountingSupplierParty/cac:Party/cac:PartyTaxScheme/cbc:CompanyID,
Required field missing or empty: Invoice/cac:AccountingSupplierParty/cac:Party/cac:PartyTaxScheme/cac:TaxScheme/cbc:ID,
Required field missing or empty: Invoice/cac:AccountingCustomerParty/cac:Party/cac:PartyTaxScheme/cbc:CompanyID,
Required field missing or empty: Invoice/cac:AccountingCustomerParty/cac:Party/cac:PartyTaxScheme/cac:TaxScheme/cbc:ID
To fix this, modify both mapping files of the Portuguese country mandate – the Avalara ELR Invoice Field Configuration and the Avalara ELR CreditNote Field Configuration:
-
Download the two mapping files.
For details, see Downloading Mapping File.
-
In each file, locate the four field definitions.
Field Path Custom Mapping Invoice/cac:AccountingSupplierParty/cac:Party/cac:PartyTaxScheme/cbc:CompanyIDSourceObject:ONB2__Tenant__cField:ONB2__TaxID__cInvoice/cac:AccountingSupplierParty/cac:Party/cac:PartyTaxScheme/cac:TaxScheme/cbc:IDStaticValue:VATInvoice/cac:AccountingCustomerParty/cac:Party/cac:PartyTaxScheme/cbc:CompanyIDSourceObject:AccountField:ON_VATNumber__cInvoice/cac:AccountingCustomerParty/cac:Party/cac:PartyTaxScheme/cac:TaxScheme/cbc:IDStaticValue:VATIn the Avalara ELR CreditNote Field Configuration, the paths start with
CreditNote/instead ofInvoice/. Each of the paths occurs only once in the file.Map the definitions that end with
cbc:ID. The definition.../cac:PartyTaxScheme/cac:TaxSchemeitself only groups this field and cannot be mapped. -
Add the custom mappings.
For the seller, the definitions look like this:
"path" : "Invoice/cac:AccountingSupplierParty/cac:Party/cac:PartyTaxScheme/cbc:CompanyID",
"optionality" : "Required",
"ONB2_Custom_Mapping" : {
    "SourceObject" : "ONB2__Tenant__c",
    "Field" : "ONB2__TaxID__c"
}
"path" : "Invoice/cac:AccountingSupplierParty/cac:Party/cac:PartyTaxScheme/cac:TaxScheme/cbc:ID", "optionality" : "Required", "ONB2_Custom_Mapping" : { "StaticValue" : "VAT" }For the buyer, the definitions look like this:
"path" : "Invoice/cac:AccountingCustomerParty/cac:Party/cac:PartyTaxScheme/cbc:CompanyID",
"optionality" : "Required",
"ONB2_Custom_Mapping" : {
    "SourceObject" : "Account",
    "Field" : "ON_VATNumber__c"
}
"path" : "Invoice/cac:AccountingCustomerParty/cac:Party/cac:PartyTaxScheme/cac:TaxScheme/cbc:ID", "optionality" : "Required", "ONB2_Custom_Mapping" : { "StaticValue" : "VAT" }The buyer VAT identifier can come from the account, like BT-48 in the default mapping, or from a field on the invoice (
ONB2__Invoice__c) that holds the buyer's VAT ID. If the account fieldON_VATNumber__cis not populated for every customer, map a formula field that falls back to the account fieldVATIN. -
Save the files.
-
Upload each modified file as a new version.
For details, see Uploading Modified Mapping File.
After the subsequent validation, the e-invoices and credit notes of the Portuguese country mandate carry the VAT identifiers of seller and buyer.
Enabling Document-Level Allowances and Charges
By default, JustOn Billing & Invoice Management writes every invoice line item as an itemized invoice line. Optionally, it can write offsetting positions – invoice line items that reduce the invoiced amount – as document-level allowances (BG-20) instead. This may be necessary for specific country mandates, because some of them reject invoices whose invoice lines mix positive and negative amounts.
Unlike the other e-invoice formats, Avalara ELR country mandates do not provide a toggle for this option. Instead, you specify it in the Data field of the country mandate configuration.
To enable document-level allowances and charges for a country mandate:
-
Open the relevant country mandate configuration.
Opening a country mandate configuration
- Click to access the App Launcher, and select JustOn Billing Configuration.
- Open the Avalara ELR Configuration tab.
- Select the Country Mandates sub-tab.
-
Click the configuration name for the relevant mandate.
This opens the country mandate configuration detail page.
-
In the
Datafield, add the top-level keyenable-document-level-allowances-and-charges, and specify the valuetrue."enable-document-level-allowances-and-charges": trueSpecify
trueas a boolean, that is, without quotation marks. Unlike some other keys of theDatafield, this key does not accept a string value – specifying"true"causes a validation error when saving the configuration. -
Click Save.
For every e-invoice created using this country mandate, JustOn Billing & Invoice Management writes the offsetting positions as document-level allowances.
To disable the option again, remove the key from the Data field or set it to false.
Info
Each country mandate configuration is specific to a business entity, which means that you set the option per country mandate and business entity. To use document-level allowances and charges for more than one mandate, add the key to each of them.
Validating Country Mandate
After customizing mandate data, you must validate the Avalara ELR country mandate to ensure its compliance with the country requirements.
The validation checks the configured field mappings. A mandate is considered valid if
- all required fields have a mapping source,
- all mapping sources are accessible and correctly spelled.
To validate a mandate:
- Click to access the App Launcher, and select JustOn Billing Configuration.
- Open the Avalara ELR Configuration tab.
- Select the Country Mandates sub-tab.
-
Click the configuration name for the mandate you want to validate.
This opens the country mandate configuration detail page.
-
Click Validate.
This validates the selected mandate and the field mappings. Detailed validation results show any configuration issues in the
Validation Errorfield.
Updating Country Mandate
It may be necessary to synchronize the currently stored data of an Avalara ELR country mandate with the newest requirements and changes from Avalara.
Updates are necessary when
- Avalara changes mandate requirements,
- Avalara introduces new fields or formats,
- compliance rules change for a country.
To update the mandate information:
- Click to access the App Launcher, and select JustOn Billing Configuration.
- Open the Avalara ELR Configuration tab.
- Select the Country Mandates sub-tab.
-
Click the configuration name for the mandate you want to update.
This opens the country mandate configuration detail page.
-
Click Update.
This synchronizes the saved Avalara ELR country mandate with the current data from Avalara.
Info
Remember to review the mandate status and the mapping configuration files for new data.
Enabling Invoices to Use Avalara ELR
Invoices to be processed via Avalara ELR must have the following field values:
| Field | Required Value | Description |
|---|---|---|
| E-Invoice Distribution Channel | Avalara |
Triggers the e-invoice creation and distribution through Avalara ELR |
| E-Invoice Format | Country mandate subtypeDE-B2G-PEPPOL |
Indicates the specific e-invoice format based on the Avalara ELR country mandate |
The two fields must be populated correctly for the Avalara ELR processing to work. Invoices on which one of the values is missing or wrong will not be processed via Avalara ELR.
Enabling invoices for the e-invoice distribution via Avalara ELR therefore also involves:
- Adding
Avalaraas an e-invoice distribution channel - Adding the new country mandates as e-invoice formats
Adding E-Invoice Distribution Channel
If you have upgraded JustOn Billing & Invoice Management from an older version, you may have to add Avalara ELR as an e-invoice distribution channel manually. To do so:
- Click to enter Setup, then navigate to the object management settings of the Invoice object (
ONB2__Invoice__c). - Click Fields & Relationships.
- Click the name of the
E-Invoice Distribution Channelfield. -
In the Values section, click New.
Add the new status value
Avalara. -
Click Save.
This saves the specified status values as required.
For help about editing picklists, see Modifying Picklist Values.
Adding E-Invoice Formats
After adding new mandates, you must add the relevant mandate subtypes as picklist values to the Invoice field E-Invoice Format. To do so:
- Click to enter Setup, then navigate to the object management settings of the Invoice object (
ONB2__Invoice__c). - Click Fields & Relationships.
- Click the name of the
E-Invoice Formatfield. -
In the Values section, click New.
Add the relevant mandate subtypes, each in a new line, for example
DE-B2B-PEPPOL
DE-B2G-PEPPOL -
Click Save.
This adds the country mandates as e-invoice formats, making them available for selection on invoices.
For help about editing picklists, see Modifying Picklist Values.
Configuring Post-Processing
For some country mandates, Avalara ELR cannot send the produced e-invoice XML files to the recipient. This includes mandates where eInvoicingFlow is set to Pre-Clearance e-Invoicing or Compliance e-Invoicing. (Find this information in the Information field of the country mandate configuration.)
In this case, JustOn Billing & Invoice Management handles the final distribution of the downloaded e-invoice XML files. There are two post-processing modes:
Email: prepares the invoice for being automatically sent via emailManual: updates the invoice for being manually distributed
Depending on the country mandate, post-processing can additionally
- write data returned by Avalara (like a clearance ID or QR code) to invoice fields – see Mapping Avalara Response Data
- rebuild the invoice PDF so that this data appears on the customer-facing document – see Rebuilding Invoice PDF
The post-processing behavior is configured in the Data field of the country mandate configuration under the response-mapping and post-processing properties – see Understanding Country Mandate Data.
Mapping Avalara Response Data
Once Avalara ELR reports the document status Complete, the notification may include additional data returned by the tax authority – for example, a clearance ID, a registration number, or a QR code – delivered as responseKey/responseValue pairs. Using a response mapping, JustOn Billing & Invoice Management writes these values to fields on the invoice, from where they can be rendered into the rebuilt invoice PDF.
Note
The target fields and the corresponding template placeholders must exist before you activate the mandate. The response mapping writes to existing fields only – it does not create them. The target-field API name must match exactly (case-sensitive).
To set up a response mapping:
-
Create a custom field on the Invoice object (
ONB2__Invoice__c) for each response value you want to store.For help about creating fields, see Creating New Fields.
The available
responseKeyvalues depend on the country mandate. Check the Avalara ELR documentation for the relevant mandate to see which keys it returns. -
Allowlist each new field to make it accessible for custom placeholders.
For details, see Field Whitelist.
-
Create a custom placeholder for each field, setting it up to retrieve the corresponding field on the invoice.
For details, see Custom Placeholders.
-
Add each placeholder to an appropriate text field of your invoice template.
Possible target text fields may be
Text 2orText 3.Make sure to apply the placeholder filter
no-persistto the placeholder so that the value is rendered from the live field at rebuild time. -
Open the relevant country mandate configuration.
Opening a country mandate configuration
- Click to access the App Launcher, and select JustOn Billing Configuration.
- Open the Avalara ELR Configuration tab.
- Select the Country Mandates sub-tab.
-
Click the configuration name for the relevant mandate.
This opens the country mandate configuration detail page.
-
In the
Datafield, add aresponse-mappingarray with one entry per key:"response-mapping": [ { "response-key": "IdentificativoSdI", "target-field": "CustomRegistrationNumber__c" }, { "response-key": "QRCode", "target-field": "CustomQRCode__c" } ]Key Description response-keyThe key name returned by Avalara in the events[].responseKeyfield of the document status.target-fieldThe API name of the Invoice field that receives the corresponding responseValue. -
Click Save.
When a
Completenotification is received, JustOn Billing & Invoice Management writes each mappedresponseValueto its target field. Unmapped keys are ignored.
Rebuilding Invoice PDF
If mapped response values must appear on the customer-facing invoice, JustOn Billing & Invoice Management can regenerate the invoice PDF after the response mapping step. The rebuild uses the template currently assigned to the invoice.
The rebuild uses the same mechanism as the RecreatePdfApi, which you can also call directly from flows, Apex, or REST.
Note
Do not enable the PDF rebuild for country mandates that return a ZUGFeRD file, like B2B mandates in Germany. Here, the PDF produced by Avalara is the e-invoice – a hybrid PDF that carries the invoice data as embedded XML. Regenerating the invoice PDF overwrites this file and thus invalidates the e-invoice.
For these mandates:
- Make sure that
rebuild-pdfis set tofalse. - Do not recreate the invoice PDF manually – neither using the Recreate PDF button nor using the RecreatePdfApi.
For details about how JustOn Billing & Invoice Management determines which returned file is the e-invoice, see E-Invoice File Type.
To enable the PDF rebuild:
- Open the relevant country mandate configuration.
- In the
Datafield of the country mandate configuration, navigate to thepost-processingproperty. - In the
rebuild-pdfkey, specify the valuetrue. -
Click Save.
After the response mapping, JustOn Billing & Invoice Management regenerates the invoice PDF, then distributes it according to the configured
distribution-channel.
Info
The PDF rebuild runs asynchronously: JustOn Billing & Invoice Management triggers the regeneration and continues without waiting for it to finish.
If the PDF regeneration fails, the PDF field on the invoice is cleared. In this case, recreate the PDF once the underlying error is resolved.
Troubleshooting
| Symptom | Likely cause | Resolution |
|---|---|---|
Custom field stays empty after Complete |
response-key does not match the key Avalara actually returns, or the field is not accessible to the running user |
Check the exact key in the document status events; verify the field API name and access. |
| Value mapped but not shown on the PDF | Placeholder missing, missing no-persist annotation, or PDF rebuild not enabled |
Add the placeholder with no-persist and set rebuild-pdf to true. |
PDF field cleared / no PDF after rebuild |
An error occurred during PDF regeneration, or in the communication between the platform and Salesforce | Check the invoice and platform logs, fix the underlying rendering error, and recreate the PDF. |
| The PDF returned by Avalara is replaced by an invoice PDF, while the invoice PDF itself is unchanged | e-invoice-file-type is set to application/pdf, although the returned PDF is only a supporting document |
Set e-invoice-file-type to the type of the actual e-invoice, usually application/xml – see E-Invoice File Type. |
Invoice ends in Distribution Error |
Avalara reported the document as Failed |
Open the attached validation report and check the document status in the Avalara Cockpit. |
Preparing Automatic Email Distribution
-
Open the relevant country mandate configuration.
Opening a country mandate configuration
- Click to access the App Launcher, and select JustOn Billing Configuration.
- Open the Avalara ELR Configuration tab.
- Select the Country Mandates sub-tab.
-
Click the configuration name for the mandate you want to validate.
This opens the country mandate configuration detail page.
-
In the
Datafield of the country mandate configuration, navigate to thepost-processingproperty. - In the
distribution-channelkey, specify the valueEmail. -
In the
email-file-typeskey, specify the files to be attached to the email.To include the downloaded e-invoice file produced by Avalara ELR, make sure to specify
E-Invoice.The default file attachment setting is
Invoice Pdf, E-Invoice. -
Click Save.
This saves the mandate configuration and updates the related invoices to prepare them for being automatically sent via email.
Invoice Field Updated Value E-Invoice Status Avalara Processing Complete E-Invoice Provider Status Completed E-Invoice Distribution Channel Avalara+Email E-Invoice Error empty Email Invoice true Email Status Queued Email File Types taken from email-file-typesThe email job will pick up the updated invoices and send the corresponding emails, including all configured file attachments, to the relevant recipients.
Preparing Manual Distribution
-
Open the relevant country mandate configuration.
Opening a country mandate configuration
- Click to access the App Launcher, and select JustOn Billing Configuration.
- Open the Avalara ELR Configuration tab.
- Select the Country Mandates sub-tab.
-
Click the configuration name for the mandate you want to validate.
This opens the country mandate configuration detail page.
-
In the
Datafield of the country mandate configuration, navigate to thepost-processingproperty. - In the
distribution-channelkey, specify the valueManual. -
Click Save.
This saves the mandate configuration and updates the related invoices to prepare them for being manually distributed.
Invoice Field Updated Value E-Invoice Status Avalara Processing Complete E-Invoice Provider Status Completed E-Invoice Distribution Channel Avalara+Manual E-Invoice Error empty Make sure to establish business processes to have the invoices distributed to their recipients.
Enabling Manual Post-Processing Execution
As of v2.121, you can run the e-invoice post-processing again on demand for a set of invoices – rebuilding the invoice PDF and, with the distribution-channel Email, sending the invoice email. This may be useful to retry the post-processing after a temporary problem with the provider.
JustOn Billing & Invoice Management provides the required operation as the flow action Run E-Invoice Post-Processing, but without a predefined button. This allows you to place and label the button as needed. To make the operation available on the Invoices list view, you create a screen flow and a list button.
Creating Screen Flow
- Click to open the Setup menu, then select Setup.
- Navigate to Process Automation > Flows.
- Click New Flow, then select
Screen Flow. -
Create a new input variable.
Field Value API Name idsData Type TextOptions Allow multiple values (collection)Available for inputThe variable must be named exactly
ids, in lowercase. This is a reserved name – when the list button opens the flow, Salesforce automatically populatesidswith the record IDs selected in the list view. Names likeIdsorrecordIdsare not populated. -
Add an Action element, and select the action
Run E-Invoice Post-Processing. - In the Set Input Values section, set the
Invoice Idsinput to{!ids}. -
Add a fault path from the action to a screen that displays
{!$Flow.FaultMessage}.If the post-processing is already running for the same invoices, the action reports this as a fault, and the screen displays the corresponding message.
-
Optionally, add a screen that confirms that the run has started.
-
Save and activate the flow.
Take note of the flow's
API Name. You will need it when creating the list button.
Creating List Button
- Click to open the Setup menu, then select Setup.
- Navigate to Object Manager > Invoice > Buttons, Links, and Actions.
- Click New Button or Link.
- Specify a label, for example,
Run E-Invoice Post-Processing. - For
Display Type, selectList Button, and selectDisplay Checkboxes (for Multi-Record Selection). - For
Content Source, selectURL. -
Specify the flow path.
Use the API name of the flow created before.
/flow/Run_EInvoice_PostProc -
Click Save.
Adding Button to List View
- Navigate to Object Manager > Invoice > List View Button Layout.
- Click Edit.
-
In the Custom Buttons section, move the button created before to the Selected Buttons column.

-
Click Save.
On an Invoices list view, users can now select one or more invoices and click the button to run the post-processing again for the selected invoices.
Enabling Avalara Document Status Check
You can add the Check Avalara Document Status button to the invoice detail page. This button allows users to quickly verify the current e-invoice status with Avalara ELR and view detailed error logs when issues occur during the e-invoice distribution.
Recommended filter conditions
The Check Avalara Document Status button can be added using the Lightning App Builder and is most useful when configured with appropriate filter conditions. It should only be displayed when:
- The
E-Invoice Document IDfield has a value -
The
E-Invoice Distribution Channelfield is set to one of:AvalaraAvalara+EmailAvalara+Manual
To add the status check button to the invoice detail page:
-
Open the Invoice record detail page in the Lightning App Builder.
- Navigate to an invoice.
- Click to open the Setup menu, then select Edit Page.
-
Select the top panel ("Highlights").
- Click Add Action and select the action
Check Avalara Document Status. -
Optionally, click Add Filter and set the action visibility.
Record > E-Invoice Document ID Not EqualRecord > E-Invoice Distribution Channel Equal AvalaraRecord > E-Invoice Distribution Channel Equal Avalara+EmailRecord > E-Invoice Distribution Channel Equal Avalara+Manual
Under Show components when, select
The filter logic is metand specify1 AND (2 OR 3 OR 4).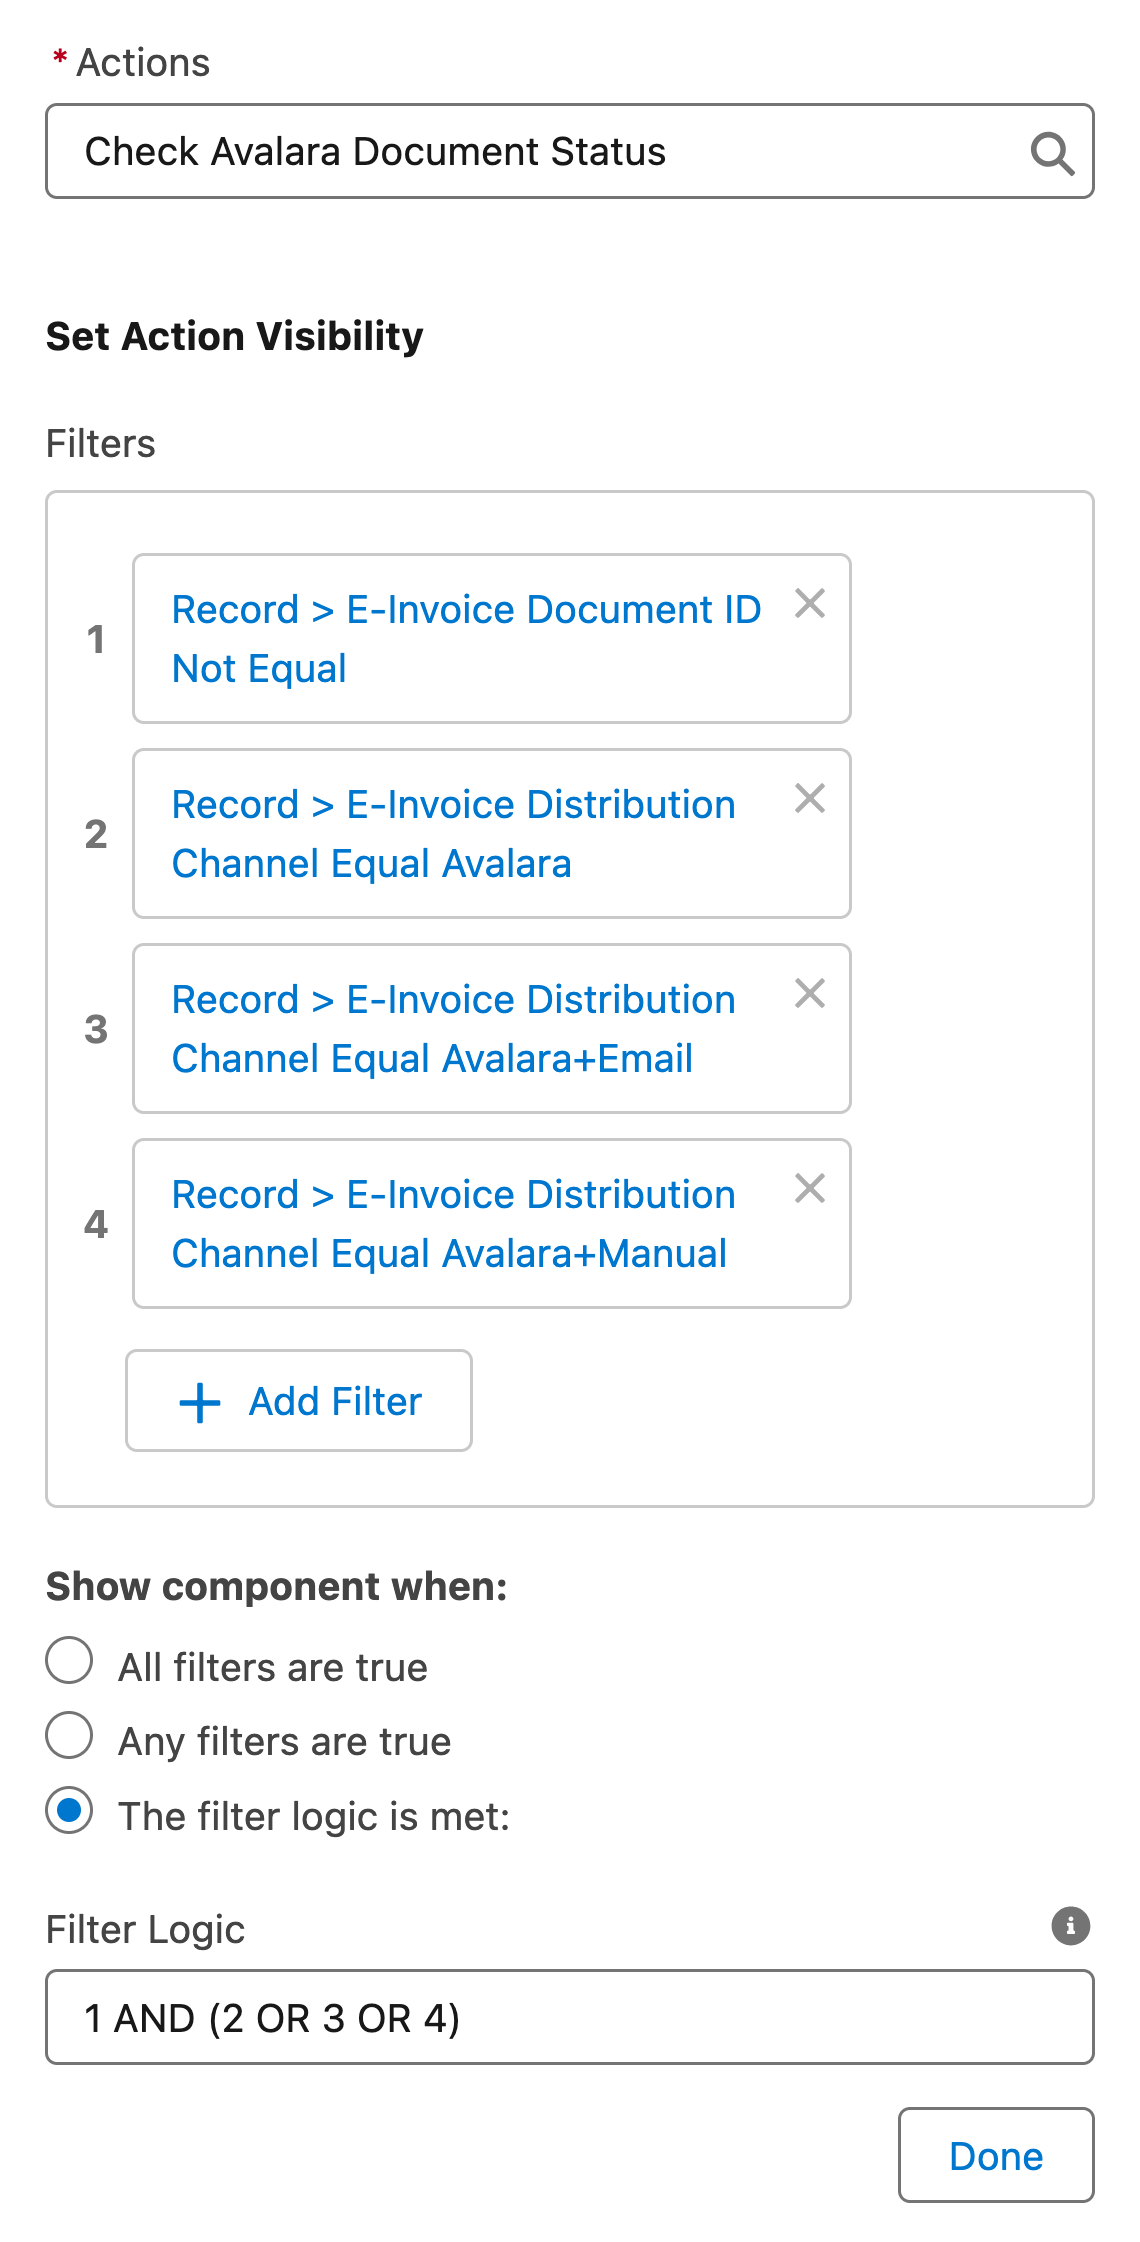
-
Click Done on the action window, then Save in the Lightning App Builder.