Configuring Standard Templates
A standard template produces its PDF with the JustOn PDF service. Configuring one according to your needs usually comprises the following tasks:
- Enabling the New Template dialog
- Creating the template
- Attaching a Liquid file
- Adjusting PDF options
- Specifying counter
- Specifying default payment due
- Editing generic text blocks
- Configuring payment reference text for SEPA Direct Debit or SEPA Credit
- Configuring payment information texts
- Modifying invoice email
- Displaying QR codes
Info
Structure and styling are defined in the Liquid file, not on the template record. To find out where to make a change, see Customizing Standard Templates. For the concepts behind this, see Standard Template Concepts. For advanced work on the Liquid file itself, see Working With Liquid Code.
For further help with template customization, contact JustOn Support.
Enabling New Template Dialog
If you have upgraded JustOn Billing & Invoice Management from an older version, you may have to enable the New Template dialog. To do so, you add the custom New button to the Templates list view:
- Navigate to the object management settings of the Template object (
ONB2__Template__c). - Click List View Button Layout.
- In the List View row, click to open the action menu, then select Edit.
-
Under Custom Buttons, move
Newto the Selected Buttons column.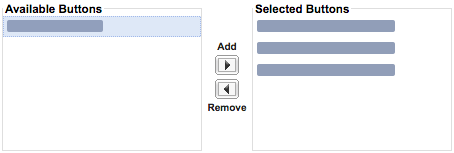
-
Under Standard Buttons, deselect
New [New].
-
Click Save to save the modified page layout.
This allows users to start the enhanced invoice creation dialog from the invoice list by clicking the New Invoice button.
Creating Standard Template
Note
Make sure that the New Template dialog is enabled.
- Open the Templates tab.
-
Click New.
This opens the New Template dialog.
-
Specify a meaningful name and select the template language.
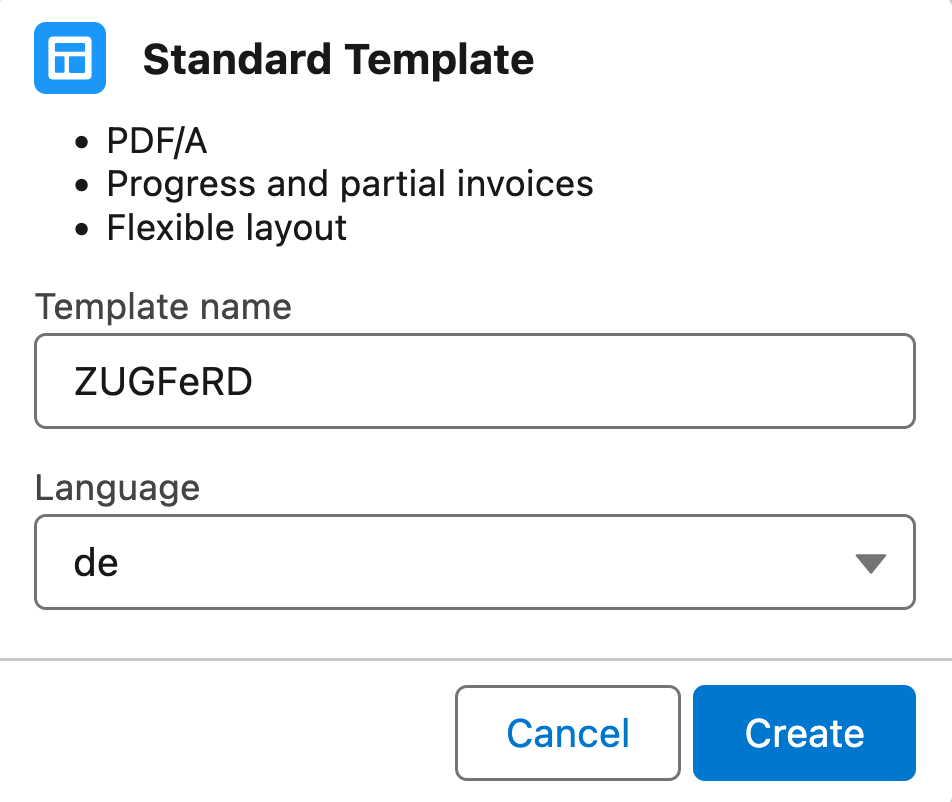
Creating a standard template -
Click Create.
This creates the template record, ready to produce PDF output:
- The
PDF Rendererfield is set tov3. - The corresponding Liquid file is attached.
Language,PDF OptionsandOverride Labelscarry the values for the selected language.
- The
Info
To create a classic template instead, use the Classic Template link at the bottom of the dialog. For details, see Classic Template Basic Setup.
To produce a variant of an existing template – for a specific customer group or business entity, for example – clone the template record instead. The clone keeps the PDF Renderer value, but not the attached Liquid file. Download the Liquid file from the original template and attach it to the clone, see Attaching a Liquid File. For details about diversifying templates, see Template Variation.
Attaching Liquid File
The New Template dialog attaches the Liquid file for you. You only attach a file yourself if you want to replace the delivered one with your own, or if you are setting up a template for a document type that the dialog does not cover.
- Open the template to be edited.
-
In the Notes & Attachments area, click to open the action menu, select Upload Files, then proceed as prompted.
This operation requires the custom
Typefield (ONB2__Type__c) to be available on the page layout of the Content Version object. For details about adding fields to page layouts, see Modifying Page Layouts or Search Layouts. -
Set the
Typeof the uploaded file toLiquid Template.The picklist value
Liquid Templatemay not be available in your org. In this case, add it to the value picklist for theTypefield of the Content Version object. For details, see Modifying Picklist Values.
The file title determines which document the file is used for:
| Liquid File Title | Used for |
|---|---|
Invoice Template |
invoices, credits, cancellations, pro forma, deposit |
Dunning Template |
all dunning levels |
Account Statement Template |
account statements |
Documents currently covered
A standard template covers invoices, credits and cancellations, as well as progress, partial pro forma and deposit invoices.
For the following documents, JustOn Billing & Invoice Management does not deliver a Liquid file yet – produce them with a classic template:
- Dunning reminders
- Account statements
The same applies to Swiss QR-bill invoices, which use their own Liquid files on the earlier v2 engine, and to payment page QR codes, which a standard template cannot print.
Existing Liquid files for dunning reminders, account statements and Swiss QR code invoices keep working with the rendering engine v2.
Example Liquid files
The following files are delivered for the earlier rendering engine v2. They are the starting point for dunning reminders and account statements, for which no standard template is delivered yet.
Invoice Template (English)
Dunning Template (English)
Account Statement Template (English)
Invoice Template (French)
Dunning Template (French)
Account Statement Template (French)
Invoice Template (German)
Dunning Template (German)
Account Statement Template (German)
For Swiss QR-bill invoices, see Setting Up Swiss QR Code Invoices.
Adjusting PDF Options
The PDF Options field controls locale, currency and number formatting, as well as rendering behavior. The field value is in JSON notation.
| Property | Description |
|---|---|
locale |
Sets the BCP 47 language code. Defaults to en. |
currency |
Sets the ISO 4217 currency code (for example, EUR). Required for the currency filter. |
currencyDisplay |
Defines the currency display format. Possible values: code, symbol, name, narrowSymbol. |
useDigitGrouping |
Toggles the digit group separator. Possible values: true (default) or false. |
minimumFractionDigitsmaximumFractionDigits |
Sets the minimum (default 0) or maximum (default 3) number of decimal places, applying to the decimal, currency and percent Liquid filters. |
escape |
Toggles HTML escaping for the whole document. Escaping is on by default; set false to disable it. To output HTML for a single value instead, use the html filter. |
strict |
If true, turns rendering-engine warnings into hard errors – useful while validating a migrated template. |
To adjust the options, open the template, click
next to the PDF Options field in the Layout & Design section, and specify the value in JSON notation, like
{
    "locale": "de-DE",
    "currency": "EUR",
    "currencyDisplay": "symbol",
    "useDigitGrouping": true,
    "minimumFractionDigits": 2,
    "maximumFractionDigits": 5
}
JustOn recommends to set at least the locale property.
The formatting properties are applied in the Liquid file through the corresponding filters: {{ value | decimal }}, {{ value | currency }} (requires locale and currency), {{ value | percent }} (requires locale), and {{ value | money }} (for objects with amount and currency properties). For details, see Using Custom Liquid Filters.
Specifying Counter
Invoices, credits, cancellations and dunnings must have unique numbers to comply with legal regulations. In Draft status, these numbers are temporary and of no legal relevance. When setting them to Open, however, JustOn creates the unique and unalterable numbers for invoices, credits, cancellations and dunnings based on defined counters. For details, see Counters and Number Ranges.
Customizing templates therefore involves specifying the counter to be used. To do so:
- Open the template or template detail to be edited.
-
In the Information section, click next to the
Counterfield and specify the counter as required.Alternatively, you can click Edit in the detail view to edit the field.
-
Click Save.
Info
Counters defined on templates overwrite counters defined for business entities.
Specifying Default Payment Due
Depending on your business requirements, you can specify the number of days that is added to the invoice date by default in order to calculate the payment due date of the invoice. To do so, you configure the template field Default Payment Due.
- Open the template to be edited.
- In the Payment Information section, click
next to the
Default Payment Duefield and specify the required number of days. - Click Save.
Info
A default payment due set on the account takes precedence. If you have not set a default payment due on the account or the template, JustOn defaults to 0.
Editing Generic Text Blocks
In the main content area, the template includes three generic text blocks that you can use for any running text to be rendered in the final document.
Text 1– Text rendered above the invoice line item table, for example, a letter-like text introducing the invoice.Text 2– Text rendered last by default, for example, a closing block.Text 3– Optional free-text block rendered below the invoice line item table.
To edit the generic text blocks:
- Open the template to be edited.
-
In the Texts section, click next to the
Text 1,Text 2orText 3field and specify the information as required.Alternatively, you can click Edit in the detail view and edit all fields at once.
-
Click Save.
Configuring Payment Reference Text
Depending on your organization's requirements, you specify a string that is to be written as the payment reference for SEPA payments. To do so, you configure the template field Payment Reference.
- Open the template to be edited.
-
In the Payment Information section, click next to the
Payment Referencefield and modify the information as required.Modify the default value
[InvoiceNo] - [InvoiceDate]as necessary.You can use the placeholders that are available for the invoice context.
-
Click Save.
Configuring Payment Information Texts
Depending on the payment method set for an invoice, you may want to provide some payment-relevant information to the invoice recipient – tell them that you collect the invoice amount via direct debit, or that you charge their credit card, or ask them to transfer the invoice amount themselves, for example.
To this end, you can use the Payment Info template fields. There are payment info fields for every applicable payment method. Depending on the payment method set on the invoice, JustOn copies the corresponding text to the Payment Info field on the invoice. Consequently, this text is printed to the invoice PDF.
Info
An invoice may already be fully paid and its status set Paid when you create the PDF. In this case, the system will show the text specified in the field Payment Info Paid.
| Payment Method | Template Payment Info Field |
|---|---|
| SEPA | Payment Info Direct Debit Payment Info Credit Transfer |
| Online Payment | Payment Info Online Payment Payment Info Future Payment |
| Bank Transfer | Payment Info Bank Transfer |
To edit the payment info text blocks:
- Open the template to be edited.
-
In the Payment Information section, click next to the
Payment Info Online Payment,Payment Info Future Payment,Payment Info Direct Debit,Payment Info Credit Transfer,Payment Info Bank TransferorPayment Info Paidfield and specify the information as required.Alternatively, you can click Edit in the detail view and edit all fields at once.
To ask your customer to transfer the payable amount in the next two weeks, you use the field
Payment Info Bank Transferspecifying, for example, the following text:Please transfer the open amount within 14 days. -
Click Save.
Modifying Invoice Email
In addition to the fields that are printed to the PDF, the invoice template also includes texts for the email that JustOn can send to distribute the rendered PDF documents. These fields include:
| Template Section | Field | Description |
|---|---|---|
| Email Text | PDF Name | Specifies the name for the generated PDF file. It can contain placeholders, the default is [InvoiceDate]_[InvoiceNo]_[AccountName].pdf. The allowed characters include the alphanumeric characters a-z A-Z 0-9 as well as the underscore _ and hyphen - characters. |
| Attach Files To Outgoing Email (checkbox) | Controls whether attached files are included in any outgoing email. | |
| Email File Types | Defines the mandatory file types to be attached to invoice emails (comma separated list of content version types, like, for example, Invoice PDF, E-Invoice).If empty, defaults to Invoice PDF.Transaction Table HTML and E-Invoice Validation Report will always be excluded from being attached. |
|
| Email Sender | Defines an email sender address, must be available as an organization-wide email address. Takes precedence over the email sender address set on the business entity. |
|
| Email Subject | Defines the default email subject. Can include placeholders, like Invoice: [InvoiceNo] (default). |
|
| Email Body | Defines the plain text (or HTML source code) body for the email. Can include placeholders, and line breaks are considered. Make sure that the email text includes the placeholder [PaymentPageURL|no-persist] for the recipients to be able to access the payment page of JustOn Cash Management. |
|
| Email HTML Body | Defines a rich HTML body text for the email. The editing area of this field includes an inline HTML editor. Must not include HTML source code. If you want to use HTML source code for preparing the email body, you use the field Email Body.Make sure that the email text includes the placeholder [PaymentPageURL|no-persist] for the recipients to be able to access the payment page of JustOn Cash Management. |
Note
Be aware of the following specifics:
Email Bodyis ignored if there is content inEmail HTML Body.- You must use either
Email BodyorEmail HTML Bodyin both the template and its associated template details. Email HTML Bodymust not include HTML source code. If you want to use HTML source code for preparing the email body, you use the fieldEmail Body.
Info
If you send email with non-Latin data, like the Euro symbol, Hebrew, Chinese, Japanese, Russian, etc., set your email encoding to Unicode (UTF-8). For details, see Why do PDF files or emails contain garbage characters?
If you specify a company signature in the email body, consider disabling user signatures. For details, see Why do emails include two signatures?
To edit the email contents:
- Open the template or template detail to be edited.
- Click Edit.
- In the Email Text section, modify the fields as required.
- Click Save.
Info
Template text blocks can contain
- plain text
- placeholders
- HTML code for tables, lists and links
If you use HTML code in template text blocks, make sure to write all code in a single line to avoid line breaks being converted to <br/> tags.
Displaying QR Codes
JustOn Billing & Invoice Management can print a SEPA credit transfer QR code on the invoice. This involves adding the image tag to the Liquid file and setting the Add QR Code field on the template.
For details, see SCT QR Codes on Standard Templates.
Defining Headers, Footers and the Page Counter
The running page header and the page counter are defined in the Liquid file using print CSS – @page margin boxes together with the counter(page) and counter(pages) functions. The Page Header record field does not apply.
The Footer record field, by contrast, is evaluated: its content is printed as the document footer exactly as entered.
For example, to render a running footer like Invoice Page 1 of 2, add the following to the <style> block of the Liquid file:
@page {
    size: A4;
    margin: 2cm 1.5cm 3cm 2.5cm;

    @bottom-center {
        content: "Invoice Page " counter(page) " of " counter(pages);
    }
}
The delivered Liquid file already defines a page counter this way. Adjust the content string to localize it, for example, content: "Seite " counter(page) " von " counter(pages);.
For details on working with Liquid files, see Working With Liquid Code.
Document metadata
The PDF document metadata is written from the Liquid file:
- the PDF title from the
<title>element (or<meta name="title">), author,subjectandkeywordsfrom the corresponding<meta>tags.
Related Tasks
For a field-by-field overview of which Template fields are read when creating the PDF and which are ignored, see Standard Template Field Usage.
For the ZUGFeRD-specific setup, see Configuring ZUGFeRD E-Invoices.
If you are moving an existing template from the earlier v2 engine, see Migrating Templates From v2 to v3.