Integrating Payment Provider
JustOn Cash Management can integrate your Salesforce org with payment service providers (PSP) in order to exchange payment information – namely, to provide your buyers the option to pay their purchases (represented as entries) via the payment page.
Administrators use Payment Provider records to configure and activate payment providers for business entities. The system then retrieves active configurations in order to interact with the PSPs.
The configuration holds both feature configurations like future payments and provider-specific data like access keys. The same PSP may be configured multiple times for a business entity, but you can create only one active payment provider setting per business entity and payment provider. Before creating a new setting for an entity/provider combination that already exists, you must deactivate the existing setting.
Configuring Payment Page Integrating Mollie Using JustOn Test Payments
Creating Payment Provider
To create a new payment provider configuration:
- Click to access the App Launcher, and select Setup Cash Management.
- Open the Payment Providers tab.
- Click New.
-
Specify the configuration details as necessary.
Field Description Name The name for this configuration record. Business Entity The business entity for which this PSP configuration is applicable. Type The payment service provider for which this configuration is applicable.
If the intended type is not available, you may have to add it to the picklist beforehand. -
Click Save.
This creates the new payment provider record.
Note that the PSP configuration is not functional until you specify the provider-specific data.
Configuring Payment Provider
Payment provider data involves
-
Provider-specific public data
PSP-specific public information like account IDs, hostnames, etc.
-
Provider-specific secret data
PSP-specific secret information like API keys, passwords, etc.
-
Payment token storage
Controls the option offered to users for saving their payment instrument.The available options include
Disabled,Explicit Consent,Explicit Opt-outandIndirect Consent.For details, see Payment Automation.
-
Payment provider activation
Enables/disables the PSP for payment users.
To modify payment provider data:
- Open the payment provider record you want to modify.
-
Click Configure Payment Provider.
-
Modify the provider-specific public information and secret information as necessary.
For details about individual payment provider integrations, see
-
Select the payment token storage option as necessary.
- Select (or deselect) the
Activecheckbox to enable (or disable) the payment provider.
-
-
Click Save.
This completes the screen flow, saving the specified information as required, and returns you to Payment Provider detail view.
Once the provider-specific data is complete, the PSP configuration is fully functional and available to payment users.
Reactivating Payment Provider
The payment run deactivates a payment provider automatically once the provider's count of temporary failures (Communication Failures) reaches the retry threshold. For details, see Capture Results.
As long as the payment provider is inactive, its payment instruments are not eligible for the payment run, and buyers cannot pay via this provider.
Note
JustOn Cash Management does not notify anyone when it deactivates a payment provider. If the payment page displays the line items but no Pay button and no error message, check whether the payment provider is still active. To detect a deactivation early, see Monitoring Payment Providers.
An automatic deactivation by the payment run can be recognized as follows:
- An error report of the type
payment-run/payment-provider-deactivatedhas been created at the time of the deactivation. - The payment provider's
Communication Failuresvalue is equal to or greater than the retry threshold. - The field history of the payment provider shows that the user who has scheduled the payment run has deselected
Activeat the time of the payment run.
To reactivate a payment provider that the payment run has deactivated:
-
Identify the cause of the temporary failures.
-
Check the error reports. The payment run creates one error report of the type
payment-run/capture-temporary-failureper failed payment, which specifies the payment, the payment provider, the payment instrument and the error message. In addition, it creates an error report of the typepayment-run/payment-provider-deactivatedwhen deactivating the payment provider.The error reports are available in the Error Reports tab. You may have to add it to the navigation bar first.
-
Check the
Last Capture Messagefield of the involved payment instruments. It holds the error message returned by the payment provider, orInternal Errorif the capture has failed within JustOn Cash Management or Salesforce. For internal errors, the corresponding error report holds the actual cause.
-
-
Fix the cause.
Typical causes include
- invalid or expired access data, like API keys, or issues with your account at the payment provider – see Configuring Payment Provider
- automation in your org that fails when JustOn Cash Management updates payments, entries, entry items or balances, like record-triggered flows, validation rules or required fields – check for failed flow interviews and flow error emails
-
Set the payment provider's
Communication Failuresvalue to0, for example, using a list view or a data management tool.Selecting
Activealone leaves the count of temporary failures in place. In this case, the next temporary failure deactivates the payment provider again. -
Open the payment provider record, and click Configure Payment Provider.
- Select the
Activecheckbox. -
Click Save.
This reactivates the payment provider, making it available to the payment run and the payment page again.
Monitoring Payment Providers
JustOn Cash Management does not notify anyone when the payment run deactivates a payment provider. The payment run notifications only cover permanent failures and go to your customers.
To detect temporary failures and deactivated payment providers early, we recommend monitoring the following:
- Payment provider status – Set up a flow or another alert that informs your administrators when the
Activecheckbox of a payment provider is deselected. - Failure count – Create a report on payment providers with a
Communication Failuresvalue greater than0, as an early warning. - Error reports – Regularly review recent error reports. Error reports whose
Detailsfield containspayment-run/capture-temporary-failureorpayment-run/payment-provider-deactivatedrelate to temporary failures and deactivated payment providers. - Failed payments and captures – Create reports on payments with the status
Failed, and on payment instruments with theLast Capture MessagevalueInternal Error(or withLast Capture Is Successset tofalse). - Org automation – Monitor failed flow interviews and flow error emails for automation on the Payment, Entry, Entry Item and Balance objects.
Deleting Payment Provider
Deleting a payment provider configuration removes the relevant payment provider from the system, together with the associated payment methods, saved secrets, etc.
To delete a payment provider:
- Open the Payment Providers tab.
-
Click and select Delete next to the payment provider record you want to delete.
This removes the complete payment provider configuration.
Enabling Payment Provider Types
To enable specific payment provider types, you may have to add the required Type values manually if you have upgraded JustOn Cash Management from an older version. To do so:
- Click to enter Setup, then navigate to the object management settings of the Payment Provider object.
- Click Fields & Relationships.
- Click the name of the
Typefield. -
In the Values section, click New.
Add the relevant payment provider, like
Mollie,JustonTestPayments, each in a new line.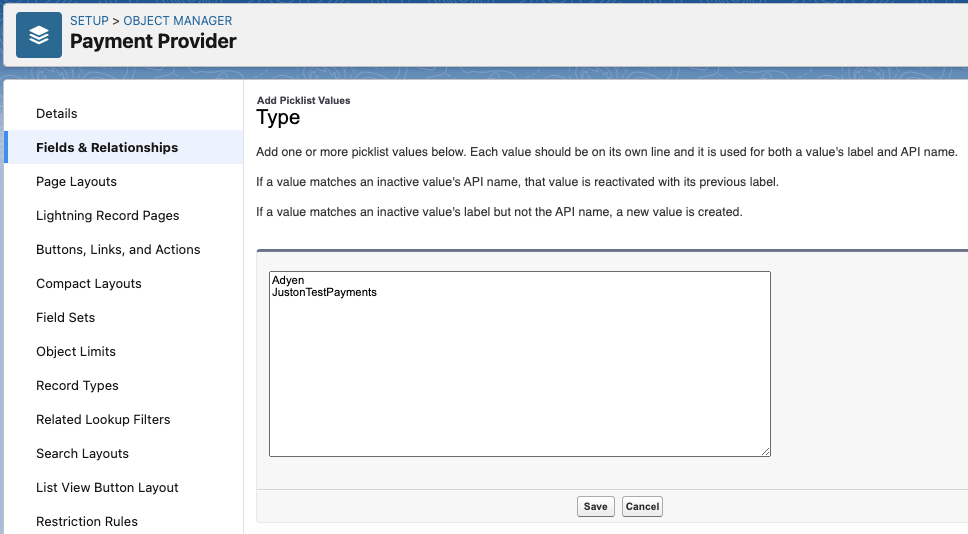
-
Click Save.
This saves the specified type values as required.
For details about modifying the values of picklist fields, see Add or Edit Picklist Values in the Salesforce Help.