Setting Up QR Code on Invoices
JustOn Billing & Invoice Management can produce QR codes for SEPA credit transfers and JustOn Cash Management's payment page. If the relevant conditions are met, it automatically creates the QR code and writes the produced data to the corresponding fields on the invoice. Consequently, the generated QR code is to be printed to the invoice PDF.
Conditions for creating SCT QR codes
For JustOn Billing & Invoice Management to create SEPA credit transfer QR codes, the following information is required:
- The invoice class is set to
Invoice. - The invoice balance is > 0, that is, a positive value.
- The field
Payment Referenceon the invoice is set (specifically or by fallback toPayment Referenceon the template). - The field
Business Entityon the invoice is set. - The field
Companyon the business entity is set. - The field
IBANon the business entity is set.
For details on SEPA credit transfer QR code creation, see SEPA Credit Transfer QR Codes.
Configuring the QR code management involves the following tasks:
- Adding QR code fields to the invoice page
- Configuring the invoice template to include QR codes
- Enabling access to the JustOn PDF service
If you have not done so when installing the package, you must, in addition, explicitly allow accessing the JustOn PDF service.
Adding QR Code Fields
JustOn Billing & Invoice Management writes QR code data to the following Invoice fields:
| Field | Description |
|---|---|
| Credit Transfer Content | The original content of the SCT QR code as human-readable text. |
| Credit Transfer Content Error | Holds meaningful errors if the SCT QR code could not be created. Usually set if some data is missing. |
| Credit Transfer QR Code | Holds the actual SCT QR code image. Is to be included in the invoice PDF using a placeholder. |
| Payment Page URL | The link to the payment page exposed by JustOn Cash Management. |
| Payment Page URL Error | Holds meaningful errors if the payment page QR code could not be created. Usually set if some data is missing. |
| Payment Page URL QR Code | Holds the actual payment page QR code image. Is to be included in the invoice PDF using a placeholder. |
By default, these fields are not available in the user interface. However, your business may require your users to access the error information, for example. To this end, you add the corresponding fields to the Invoice page layout or the list view.
To add Credit Transfer Content Error or Payment Page URL Error to the Invoice page layout:
- Click to enter Setup, then navigate to the object management settings of the Invoice object (
ONB2__Invoice__c). - Click Page Layouts.
- In the Invoice Layout row, click , then select Edit.
- Drag the fields
Credit Transfer Content ErrororPayment Page URL Errorto the page layout. -
Click Save.
This adds the QR code-related error field to the Invoice page layout.
To add Credit Transfer Content Error or Payment Page URL Error to the Invoice list view:
- Open the Invoices tab.
- Click on top of the list, then select Select Fields to Display.
-
Move
Credit Transfer Content ErrororPayment Page URL Errorto the Visible Fields column.
-
Click Save.
This adds the QR code-related error field to the Invoice list view.
Enabling QR Code Display on PDF
In order for invoice recipients to make use of QR codes to initialize payments, the printed invoices must include the QR codes. To this end, you must configure the relevant invoice template accordingly.
Depending on the PDF rendering mechanism and the corresponding template type, the configuration for enabling the QR code display differs:
- QR codes on standard templates with Visualforce PDF
- SCT QR codes on Liquid templates with JustOn PDF Service
QR Codes on Standard Templates with Visualforce PDF
JustOn Billing & Invoice Management provides two custom placeholders that retrieve the produced QR code images. You place these placeholders in an appropriate section of the relevant template.
| Placeholder | Usage |
|---|---|
[CreditTransferQrCode|no-persist] |
Retrieves the SCT QR code. Usually placed in the Template field Payment Info Bank Transfer. |
[PaymentPageUrlQrCode|no-persist] |
Retrieves the payment page code. Usually placed in the Template field Payment Info Online Payment. |
Note
Make sure to apply the placeholder filter no-persist to the QR code placeholder. It guarantees that the correct image is inserted after modifying input values and after finalizing the invoice.
- Open the template to be edited.
-
Click next to the relevant Template field (standard text or payment information) and specify the information as required.
To direct an invoice recipient to the payment page, you can use, for example, this text in the
Payment Info Online Paymentfield:Scan the code to open our payment page: [PaymentPageUrlQrCode|no-persist] -
Click Save.
Displaying relevant payment information next to QR code
Your customers may want to see what is "inside" the QR code. To this end, you can disclose the payment-relevant information from the code.
SEPA Credit Transfer QR Codes
For SEPA credit transfer (SCT) QR codes, the payment-relevant information includes the recipient, the recipient's IBAN, the amount to transfer, and the payment reference.
Assume you want to display this data in a table next the QR code image. Proceed as follows:
-
Create the custom placeholder
[PaymentReference].Field Value Name PaymentReferenceField PaymentReference__cRender as TEXTSource InvoiceFor details, see Defining Custom Placeholder.
-
Configure an appropriate Template field to include the QR code.
This can be a standard text block or a payment information text.
If your business requests a SEPA credit transfer from the invoice recipient, the invoice payment method is usually set to
Bank Transfer. In this case, you can use the Template fieldPayment Info Bank Transfer.Remember that if you use HTML code in template text blocks, you must write all code in a single line to avoid line breaks being converted to
<br/>tags.Specify, for example, the following text:
Use this code to initialize the payment operation using the banking app on your phone.

<table><tr><td rowspan="6">[CreditTransferQrCode|no-persist]</td><td><br/></td></tr><tr><td><br/></td></tr><tr><td><em>Payment information:</em></td></tr><tr><td><br/></td></tr><tr><td><table><tr><td>Recipient:</td><td>[BusinessEntityCompany]</td></tr><tr><td>IBAN:</td><td>[BusinessEntityIBAN]</td></tr><tr><td>Amount:</td><td>[Balance|no-persist]</td></tr><tr><td>Reference:</td><td>[PaymentReference|no-persist]</td></tr></table></td></tr><tr><td><br/></td></tr></table>
This produces the following output in the PDF:
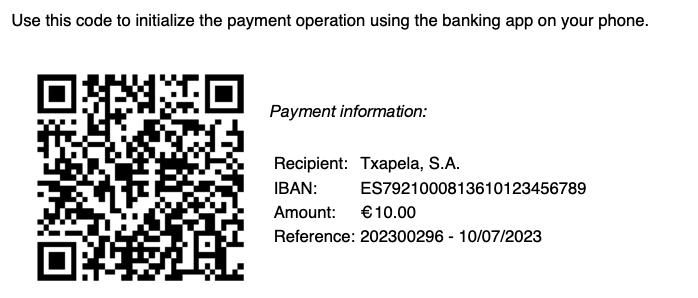
Example SCT QR code and disclosed payment informationIf you want a smaller and framed image, you can use, for example, the following HTML table and some custom CSS.
HTML table<div class="page-break"><table width="100%"><tr><td width="30%"><b>Bank Name (BIC):</b></td><td width="70%">[BusinessEntityBankName] ([BusinessEntityBIC])</td><td rowspan="6" style="text-align: right;"><div class="qr-code-wrapper">[CreditTransferQrCode|no-persist]<span class="vertical-text">Scan to pay</span></div></td></tr><tr><td></td><td></td></tr><tr><td><b>Recipient:</b></td><td>[BusinessEntityCompany]</td></tr><tr><td><b>IBAN:</b></td><td>[BusinessEntityIBAN]</td></tr><tr><td><b>Payment Amount:</b></td><td>[Balance|no-persist]</td></tr><tr><td><b>Payment Reference:</b></td><td>[PaymentReference]</td></tr></table><div/>Custom CSS.CreditTransferQrCode.value img { width: 2.5cm !important; height: 2.5cm !important; border: 2px solid #000; } .vertical-text { display: inline-block; background-color: white; font-size: 10px; position: relative; bottom: 13px; padding-left: 3px; padding-right: 3px; } .qr-code-wrapper { text-align: center; } table tr,table td { page-break-inside: avoid; } table { page-break-after: avoid; }This produces the following output in the PDF:

Example SCT QR code with frame and help text
Payment Page QR Code
In QR codes that encode the link to JustOn Cash Management's payment page, the corresponding URL is the only encoded information.
Assume you want to display the URL as a readable text together with the QR code image. Proceed as follows:
-
Create the custom placeholder
[PaymentPage].Field Value Name PaymentPageField PaymentPageUrl__cRender as PLAINSource InvoiceYou can also decide to overwrite the built-in placeholder
[PaymentPageURL](which creates a clickable link, masking the URL) if you are sure that you will not need it.For details, see Defining Custom Placeholder.
-
Configure an appropriate Template field to include the QR code.
This can be a standard text block or a payment information text.
If your business requests the payment to be made using JustOn Cash Management's payment page, the invoice payment method must be set to
Online Payment. In this case, you can use the Template fieldPayment Info Online Payment.Specify, for example, the following text:
Scan the code to open our payment page:

[PaymentPageUrlQrCode|no-persist]

[PaymentPage|no-persist]
If you want the QR code image to be a clickable link, use, for example, this text:
Scan or click the code to open our payment page:

<a href="[PaymentPage|no-persist]">[PaymentPageUrlQrCode|no-persist]</a>

[PaymentPage|no-persist]
This produces the following output in the PDF:
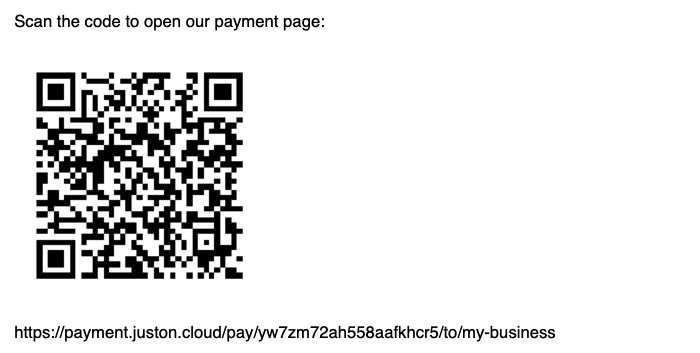
Example payment page QR code and disclosed URL
SCT QR Codes on Liquid Templates with JustOn PDF Service
To prepare a template that uses the JustOn PDF service to include SCT QR codes:
-
Prepare a template to use Liquid templates and the JustOn PDF service.
For details, see Configuring Liquid Template Rendering.
-
In the attached Liquid template file for invoices (most likely, Invoice template.liquid), add the tag for embedding the produced QR code image in an appropriate section.
Use the following code:
<img class="qrcode-payment" src="{{QrCode.DataURI}}">For details on working with Liquid files, see Working With Liquid Code.
-
In the
Add QR Codefield of the template, selectSCT QR Code. - Optionally, specify options for the PDF output or define a page header and footer as required.
- Click Save.
Enabling Access to JustOn PDF Service
JustOn Billing & Invoice Management provides a dedicated remote site setting required to access the JustOn PDF service, which produces the QR codes. If you have not done so when installing the package, or after a push upgrade, you may have to allow accessing the JustOn PDF service explicitly, activating the remote site.
To activate the remote site:
-
Click to enter Setup, then open Remote Site Settings.
In Salesforce Lightning, navigate to Security > Remote Site Settings.
In Salesforce Classic, navigate to Security Controls > Remote Site Settings.
-
Click Edit in the row of JustOn PDF Service.
- Select the
Activecheckbox. - Click Save.