Configuring Bank Data Download
← Configuring Reconciliation/Settlements
Using EBICS, banks provide machine-readable bank statement data to be used for automatic payment matching and settlement, as well as human-readable documents for regulatory reasons. JustOn Cash Management can request, retrieve and store these documents, as described in Bank Data Download.
Configuring the bank data download involves the following tasks:
- Enabling the structured storage of different bank documents
- Enabling the manual download of bank statements
- Setting up the automatic download of bank documents
Enabling Structured Bank Document Storage
JustOn Cash Management can download different types of documents from initialized bank accounts and store these documents in Salesforce Files in a dedicated library/folder structure (named by BIC/IBAN).
To enable the structured bank data storage for your org:
- Click to access the App Launcher, and select Setup Cash Management.
-
Open the Global Configuration tab.
Users who intend to access the global configuration must be assigned the System Administrator profile and explicitly allowed accessing the Global Configuration dialog.
-
Click Edit.
This launches a screen flow that shows the global configuration input fields.
-
In the Bank Statement Download section, select the
Structured File Storagecheckbox. -
Click Save to save your settings, then Finish to complete the screen flow.
This enables the structured bank data storage for your org. At the same time, JustOn Cash Management creates dedicated file libraries (named by BIC) and folders (named by IBAN) for all initialized banks based on all active EBICS bank account credentials.
Note
You must not modify the IBAN-specific folder names as created by JustOn Cash Management.
For any changes that may be necessary (for new or removed bank accounts, for example), repeat the activation step in the global configuration dialog.
Changing the platform integration user?
When JustOn Cash Management creates the library/folder structure for the structured bank data storage, the current platform integration user automatically becomes the Library Administrator.
If you decide to change the platform integration user, you must assign the Library Administrator access permission to the new user before actually doing so:
- Click to access the App Launcher, and select View All > Files.
- Click Libraries.
- In the row of the library for which you want to edit accesses (named like <BIC> - Bank Documents), click and select Manage Members.
-
Define the new Library Administrator.
- If the user who is to become the new platform integration user already is library member, open the permission dropdown next to the user and select
Library Administrator. - If the user who is to become the new platform integration user is not yet library member, add the relevant user selecting
Library Administratorfrom theAccesspicklist.
- If the user who is to become the new platform integration user already is library member, open the permission dropdown next to the user and select
You can now proceed to change the platform integration user.
Once set up, JustOn Cash Management has created the library/folder structure (named by BIC/IBAN) in Salesforce Files. In order to actually store downloaded bank account documents in the corresponding library, the users who retrieve bank data require write access.
To grant library write access to a user:
-
Click to access the App Launcher, and select View All > Files.
For easy access, you may want to add the Files tab to the navigation bar. For details, see Customizing Navigation Bar.
-
Click Libraries.
-
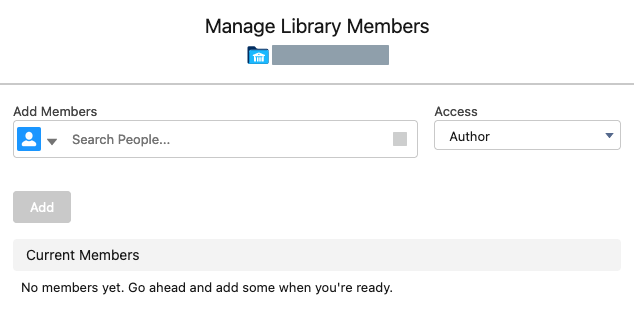
In the row of the library for which you want to edit accesses, click and select Manage Members.
-
In the
Add Membersfield, select the relevant user or group. - From the
Accesspicklist, selectAuthor. -
Click Add.
This enables the selected user or group to add files to the current library.
Enabling Manual Bank Statement Download
Enabling the download of bank statements involves the following tasks:
- Adding the button Retrieve to the Bank Statement list view
- Adding the Files related list to the UI
- Optionally, enabling the structured storage of bank documents to Salesforce libraries and folders
Adding Retrieval Button to UI
To enable the option for starting the bank statement download from the user interface, you may have to add the button Retrieve to the Bank Statement list view manually. To do so:
- Click to enter Setup, then navigate to the object management settings of the Bank Statement object.
- Click List View Button Layout.
- In the List View row, click , then select Edit.
-
Under Custom Buttons, move
Retrieveto the Selected Buttons column.
-
Click Save.
Adding Files Related List to UI
You can access the downloaded bank statements or other bank documents via the Files related list on the relevant Bank Account record.
If you have upgraded JustOn Cash Management from a pre-1.42 version, you may have to add the Files related list to the Bank Account layout view manually manually. To do so:
-
Navigate to the object management settings of the Bank Account object.
Click to open the Setup menu and select Setup, then open Objects and Fields > Object Manager > Bank Account.
-
Click Page Layouts.
- Click Edit in the row of the layout you intend to modify.
- Select the Related Lists palette.
- Drag the Files list to the Related Lists section.
-
Click Save.
This adds the Files related list to the Bank Account detail view.
Configuring Automatic Bank Data Download
JustOn Cash Management can automatically download bank data on a regular basis.
To this end, JustOn Cash Management provides the dedicated Apex class DownloadBankStatementsJob, which is to be scheduled using the standard Salesforce Schedule Apex functionality.
Info
During the bank data download, JustOn Cash Management only processes bank accounts with the access method set to EBICS. Bank accounts with a different access method are skipped, and a warning is added to the job log.
For IBANs that do not yet exist in Salesforce, you can control whether new bank accounts are created automatically using the Extend Bank Accounts During Download global setting.
Note
Users who intend to schedule the bank data download must be able to access the relevant EBICS bank account credential record. There are two ways to achieve this:
- The user has created the relevant EBICS bank account credential record, or
- The relevant EBICS bank account credential record is not locked to the user who has created it (see Sharing Bank Access Configurations).
-
Click to enter Setup, then open Apex Classes.
In Salesforce Lightning, navigate to Custom Code > Apex Classes.
In Salesforce Classic, navigate to Develop > Apex Classes.
-
Click Schedule Apex on top of the list.
-
Specify the details as required.
- Job Name, like
Download Bank Statements Job - Apex Class:
DownloadBankStatementsJob -
Frequency:
WeeklyorMonthly(with an according day of week or day of month setting)We recommend a daily interval (
Weeklywith every day selected) so that there will be no gaps in the bank data.In case of data gaps after the automatic download, a user must fetch the corresponding bank data manually. Be aware, however, that banks usually provide data for a limited period only, like 14 days.
-
Start
-
End
Required, so if you want it to run virtually forever, select a date far in the future.
-
Preferred Start Time
- Job Name, like
-
Click Save.
This sets up the bank data download to be executed automatically at the specified time.
Info
Before the bank data download is executed automatically for the first time, the user under whose credentials the job is running must have retrieved bank statements manually once. This is necessary so that the bank can verify the user data and authorizations.