Completing Additional Setup
← Setting Up JustOn Cash Management
Setting up JustOn Cash Management may include additional, optional or potentially required tasks. This may be necessary for specific business use cases or if you have upgraded JustOn Cash Management from an older version.
Optional setup steps include:
- Common setup tasks
- Payment provider-related setup tasks
- Banking-related setup tasks
Enabling Large Error Reports
In case of communication errors between Heroku, Salesforce and third-party systems, JustOn Cash Management writes error reports. The relevant information is saved to the Details field of the dedicated Error Report records. The field length is limited to 131.072 characters. If the information exceeds this limit, JustOn Cash Management writes the complete error report to a file, which is attached to the corresponding Error Report record. You can access the attached error report file via the Files related list on the relevant Error Report record.
If you have upgraded JustOn Cash Management from a pre-1.32 version, you must add the Files related list to the Error Report detail view manually. This enables error reports that are larger than 131.072 characters.
To add the Files related list to the Error Report detail view:
-
Navigate to the object management settings of the Error Report (JPAY1__ErrorReport__c) object.
Click to open the Setup menu and select Setup, then open Objects and Fields > Object Manager > Error Report.
-
Click Page Layouts.
- Click Edit in the row of the layout you intend to modify.
- Select the Related Lists palette.
- Drag the Files list to the Related Lists section.
-
Click Save.
This adds the Files related list to the Error Report detail view. This enables error reports that are larger than 131.072 characters.
Enabling Payment Statuses
To enable specific operations on payments, you may have to add the required Status values manually if you have upgraded JustOn Cash Management from an older version. To do so:
- Click to enter Setup, then navigate to the object management settings of the Payment object (
JPAY1__Payment__c). - Click Fields & Relationships.
- Click the name of the
Statusfield. -
In the Values section, click New.
Add the relevant status values, like
Canceled,Failed,Pending,Refunded, each in a new line.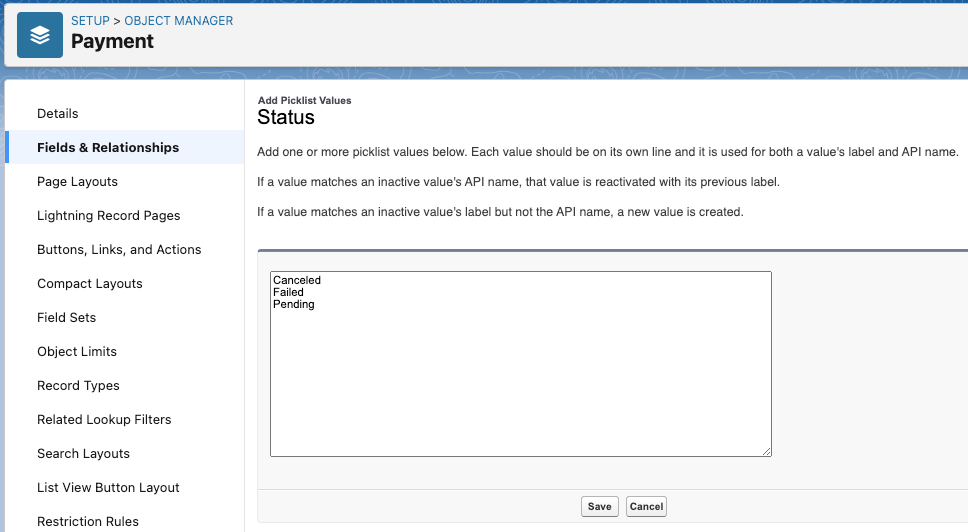
-
Click Save.
This saves the specified status values as required.
For details about modifying the values of picklist fields, see Add or Edit Picklist Values in the Salesforce Help.
Enabling Payment Status Display
Users may require to easily assess the current processing status of payments in a graphical representation. To this end, JustOn Cash Management provides a dedicated status component, which is part of the default Payment record page.
If you use a custom Payment record page, you can, optionally, add the payment status component to your page.
To do so:
-
Open your custom Payment record detail page in the Lightning App Builder.
-
Open a Payment record.
Click to access the App Launcher, and select Cash Management > Payments > record name.
-
Click to open the Setup menu, then select Edit Page.
-
-
Modify the page layout.
Add the
Payment Processing Statuscomponent (under Custom - Managed) to an appropriate region of the record page. -
Click Save.
This makes the customized record page available to users, enabling them to easily assess the current payment processing status on the payment detail view.
For more details about editing Lightning pages, see Create and Configure Lightning Experience Record Pages in the Salesforce Help.
Enabling Payment Notification History Display
If you have enabled history tracking for payment notifications, you must add the History related list to the page layout manually when upgrading JustOn Cash Management from a pre-1.59 version. To do so:
- Click to enter Setup, then navigate to the object management settings of the Payment Notification object.
- Click Page Layouts.
- In the Payment Notification Layout row, click , then select Edit.
- From the Related Lists palette, drag the Payment Notification History list to the Related Lists section.
- Click Save.
- From the object management settings of the Payment Notification object, click Lightning Record Pages.
- Open the Payment Notification Record Page, and click Edit (or Clone if you edit the record page for the first time).
- Drag the Related List - Single component to an appropriate section of the page.
- In the
Related Listfield of the component properties, selectPayment Notification History. - Click Save.
-
Click Activate.
This makes the customized record page available to users.
Info
When you save the customized record page for the first time, you can activate it from the Save dialog. Later, you can use the Activation... dialog.
For more details about editing Lightning pages, see Create and Configure Lightning Experience Record Pages in the Salesforce Help.
Enabling Credit Transfer
If you have upgraded JustOn Cash Management from a pre-1.18 or pre-1.43 version, you may have to enable the option for creating credit transfer orders manually. This involves
- Adding the Credit Transfer button to the Entry or Refund list view
- Activating the Refund Credit Transfer flow
Adding Credit Transfer Button
To add the button Credit Transfer to the Entry or Refund list view manually:
- Click to enter Setup, then navigate to the object management settings of the Entry or Refund object.
- Click List View Button Layout.
- In the List View row, click , then select Edit.
-
Under Custom Buttons, move
Credit Transferto the Selected Buttons column.
-
Click Save.
This adds the button Credit Transfer to the Entry list view or, respectively, the Refund list view, enabling users to create SEPA Credit Transfer orders.
Activating Refund Credit Transfer Flow
To activate the Refund Credit Transfer flow:
- Click to enter Setup, then navigate to Process Automation > Flows.
- In the row of Refund Credit Transfer, click , then select View Details and Versions.
-
In the row of the newest flow version, click Activate.
This activates the Refund Credit Transfer dialog, enabling users to create SEPA Credit Transfer orders from refunds.
Enabling Settlement From Bank Statement Items
To enable the option for starting the automatic settlement from a list of bank statement items, you may have to add the button Settle Automatically to the Bank Statement Item list view manually. To do so:
- Click to enter Setup, then navigate to the object management settings of the Bank Statement Item object.
- Click List View Button Layout.
- In the List View row, click , then select Edit.
-
Under Custom Buttons, move
Settle Automaticallyto the Selected Buttons column. -
Click Save.
Enabling SEPA Batch Booking Control
SEPA Direct Debit and SEPA Credit Transfer allow to combine multiple transactions using a Batch Booking parameter. This setting controls how the combined transactions are displayed on bank statements – usually, batched transactions appear as one bank statement item. Organizations use this option to avoid information disclosure.
Be aware that banks still process batched transactions individually. The subsequent handling does not change: each transaction results in a single payment, whether it is part of a batch or not.
Depending on your JustOn Cash Management version, enabling the SEPA batch booking control for a bank account may involve two tasks:
- Adding the SEPA batch booking control fields to the Bank Account layout
- Modifying the required initial payment statuses
Adding SEPA Batch Booking Control Fields
If you have upgraded JustOn Cash Management from a pre-1.24 version, you may have to add the corresponding picklist fields SEPA Direct Debit Batch Booking, SEPA Credit Transfer Batch Booking and Initial Payment Status to the Bank Account layout manually. To do so:
- Click to enter Setup, then navigate to the object management settings of the Bank Account object.
- Click Page Layouts.
- In the Bank Account Layout row, click , then select Edit.
- Drag the fields
SEPA Direct Debit Batch Booking,SEPA Credit Transfer Batch BookingandInitial Payment Statusto the page layout. -
Click Save.
This adds the picklist fields to the bank account detail view, enabling users to control the batch booking creation for an individual bank account.
Enabling Initial Payment Statuses
JustOn Cash Management 1.49 has changed the default initial status of the produced payment from Issued to Pending. As of version 1.49, Issued will no longer be used.
If you have upgraded from a pre-1.49 version, you may have to manually adjust the required values in the Initial Payment Status picklist accordingly – adding Pending as a new value and setting it the default option. To do so:
- Click to enter Setup, then navigate to the object management settings of the Bank Account object (
JPAY1__BankAccount__c). - Click Fields & Relationships.
- Click the name of the
Initial Payment Statusfield. -
In the Values section, click New.
Add the new status value
Pending. -
Click Save.
- Click Edit in the row of
Pending. -
Select the checkbox
Default.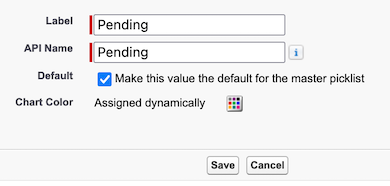
-
Click Save.
This saves the new status value
Pendingand makes it the default option. -
Click Del in the row of the obsolete value
Issued, then OK to confirm the operation. - When prompted, select
Replace value on records with Pending. -
Click Save.
This deletes the obsolete value
Issuedand replaces any occurrences withPending.
Info
For details about modifying the values of picklist fields, see Add or Edit Picklist Values in the Salesforce Help.
Enabling Proprietary Bank Account Identifiers
Some banks work with old or proprietary bank account identifiers instead of the IBAN, and, accordingly, produce CAMT.053 bank statement files without IBAN. In that case, the bank data retrieval with JustOn Cash Management will fail. To support these banks, you must add the proprietary bank identifier to the relevant bank account record.
Info
Check whether your bank's listing includes a corresponding note in Supported Banks.
To enable the option for specifying a proprietary bank account identifier, you may have to add the corresponding field Proprietary Bank Account Identifier to the Bank Account layout manually if you have upgraded JustOn Cash Management from an older version. To do so:
- Click to enter Setup, then navigate to the object management settings of the Bank Account object.
- Click Page Layouts.
- In the Bank Account Layout row, click , then select Edit.
- Drag the field
Proprietary Bank Account Identifierto the page layout. -
Click Save.
This adds the field to the bank account detail view, enabling users to specify a proprietary bank account identifier for an individual bank account.
Enabling Chargeback Information Display
When using SEPA Direct Debit or SEPA Credit Transfer, return debits or other chargeback operations may occur if a direct debit or credit transfer cannot be carried out or is rejected by the business partner. In this case, the other party's bank will reverse the original direct debit or credit transfer – returning the corresponding amount to the payer.
Assume a merchant-buyer relation, where the merchant initiates the SEPA orders:
- For direct debit chargebacks, this produces a credit to the buyer's (the debtor's) account and a debit to the merchant's account.
- For credit transfer chargebacks, this produces a credit to the merchant's account.
Any banking fees will usually be charged to the party who has initiated the SEPA request.
JustOn Cash Management uses specific amount fields to indicate the instructed (originally initiated) amount, the transaction amount, cumulated charges and the effective amount on bank statement items.
| Field | Description |
|---|---|
| Cumulated Charges | Sum of charges that are included in the current banking transaction. |
| Effective Amount | The absolute amount without charges and interests. If set, will be used for further processing instead of Total Amount. |
| Instructed Amount | The originally initiated amount before charges deduction. The currency may differ from the reported currency. |
| Transaction Amount | The amount of money moved in the current banking transaction plus internal charges. External charges are not included. |
If required by your business, you may have to add the chargeback-related amount fields to the Bank Statement Item detail view manually. To do so:
- Click to enter Setup, then navigate to the object management settings of the Bank Statement Item object.
- Click Page Layouts.
- In the Bank Statement Item Layout row, click , then select Edit.
- Drag the fields
Cumulated Charges,Effective Amount,Instructed AmountandTransaction Amountto the page layout. -
Click Save.
This adds the chargeback-related amount fields to the bank statement item detail view.